Acer G330 User Manual - Page 124
Entering the onboard Intel SATA RAID Configuration Utility, Creating the RAID 1 volume
 |
UPC - 750519177044
View all Acer G330 manuals
Add to My Manuals
Save this manual to your list of manuals |
Page 124 highlights
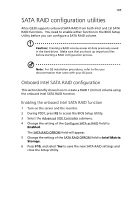
106 Appendix B: SATA RAID configuration Entering the onboard Intel SATA RAID Configuration Utility Note: There must be more than two SATA hard drives installed in the system, otherwise the Intel Matrix Storage Manager option ROM will be disabled. During POST, press Ctrl-I in the Intel Matrix Storage Manager option ROM prompt. Creating the RAID 1 volume 1 In the Onboard SATA RAID Configuration Utility, select 1. Create RAID Volume under the Main Menu, then press Enter. 2 Specify a name for the new RAID volume, then press Enter. 3 Use the Up and Down arrow keys to select RAID 1 (Mirror), then press Enter. 4 Use the space bar to select the drives that you want to add to the array, then press Enter. This step is only applicable for systems with more than two hard drives installed. 5 Press Enter to accept the RAID 1 volume capacity. 6 Press Enter, then Y to start creating the new RAID 1 volume. Once the new RAID 1 volume is created, it'll be listed under the Disk/Volume Information. 7 Revert to the Main Menu and select 4. Exit the MAIN MENU, then proceed to the OS installation.
-
 1
1 -
2
-
3
-
4
-
5
-
6
-
7
-
8
-
9
-
10
-
11
-
12
-
13
-
14
-
15
-
16
-
17
-
18
-
19
-
20
-
21
-
22
-
23
-
24
-
25
-
26
-
27
-
28
-
29
-
30
-
31
-
32
-
33
-
34
-
35
-
36
-
37
-
38
-
39
-
40
-
41
-
42
-
43
-
44
-
45
-
46
-
47
-
48
-
49
-
50
-
51
-
52
-
53
-
54
-
55
-
56
-
57
-
58
-
59
-
60
-
61
-
62
-
63
-
64
-
65
-
66
-
67
-
68
-
69
-
70
-
71
-
72
-
73
-
74
-
75
-
76
-
77
-
78
-
79
-
80
-
81
-
82
-
83
-
84
-
85
-
86
-
87
-
88
-
89
-
90
-
91
-
92
-
93
-
94
-
95
-
96
-
97
-
98
-
99
-
100
-
101
-
102
-
103
-
104
-
105
-
106
-
107
-
108
-
109
-
110
-
111
-
112
-
113
-
114
-
115
-
116
-
117
-
118
-
 119
119 -
 120
120 -
 121
121 -
 122
122 -
 123
123 -
 124
124 -
 125
125 -
 126
126 -
 127
127 -
 128
128 -
 129
129 -
130
-
131
-
132
-
133
-
134
 |
 |
