Acer G330 User Manual - Page 72
Entering BIOS setup, BIOS setup interface, BIOS setup navigation keys
 |
UPC - 750519177044
View all Acer G330 manuals
Add to My Manuals
Save this manual to your list of manuals |
Page 72 highlights
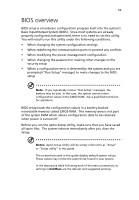
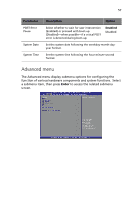
54 4 System BIOS Entering BIOS setup 1 Turn on the server and the monitor. If the server is already turned on, close all open applications, then restart the server. 2 During POST, press F2. If you fail to press F2 before POST is completed, you will need to restart the server. Note: If you are unable to access BIOS setup, you need to clear the CMOS RAM. Go to page 80 for instructions. BIOS setup interface The BIOS setup menu interface is divided into the following: • Menu bar - Displays the primary BIOS setup menus. • Left frame - Displays the menu fields. Grayed-out fields are display-only items. Blue fields are user-configurable. When a field is selected, it is highlighted in white. • Right frame - Displays the key legend (navigation keys). Above the key legend is an area reserved for a text description of the currently selected field. BIOS setup navigation keys The BIOS setup utility uses a key-based navigation system called hot keys. Use the following keys to move around the Setup utility. • Left and Right arrow keys - Move between menu selections. • Tab or Up/Down arrow keys - Move the cursor to the field you want. • Enter key - Display a submenu screen. Note: Primary menus marked by a (>) include submenu fields.
-
 1
1 -
2
-
3
-
4
-
5
-
6
-
7
-
8
-
9
-
10
-
11
-
12
-
13
-
14
-
15
-
16
-
17
-
18
-
19
-
20
-
21
-
22
-
23
-
24
-
25
-
26
-
27
-
28
-
29
-
30
-
31
-
32
-
33
-
34
-
35
-
36
-
37
-
38
-
39
-
40
-
41
-
42
-
43
-
44
-
45
-
46
-
47
-
48
-
49
-
50
-
51
-
52
-
53
-
54
-
55
-
56
-
57
-
58
-
59
-
60
-
61
-
62
-
63
-
64
-
65
-
66
-
 67
67 -
 68
68 -
 69
69 -
 70
70 -
 71
71 -
 72
72 -
 73
73 -
 74
74 -
 75
75 -
 76
76 -
 77
77 -
78
-
79
-
80
-
81
-
82
-
83
-
84
-
85
-
86
-
87
-
88
-
89
-
90
-
91
-
92
-
93
-
94
-
95
-
96
-
97
-
98
-
99
-
100
-
101
-
102
-
103
-
104
-
105
-
106
-
107
-
108
-
109
-
110
-
111
-
112
-
113
-
114
-
115
-
116
-
117
-
118
-
119
-
120
-
121
-
122
-
123
-
124
-
125
-
126
-
127
-
128
-
129
-
130
-
131
-
132
-
133
-
134
 |
 |
