Alcatel OS6855-24 User Guide - Page 84
Attaching a Power Supply to the Power Supply Tray, Note., Attaching the Power Supply Tray to the Rack
 |
View all Alcatel OS6855-24 manuals
Add to My Manuals
Save this manual to your list of manuals |
Page 84 highlights
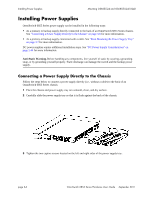
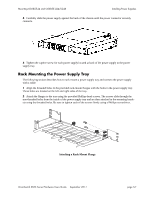
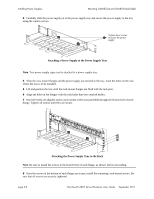
Installing Power Supplies Mounting OS6855-24 and OS6855-U24/U24X 3 Carefully slide the power supply on to the power supply tray and secure the power supply to the tray using the captive screws. Tighten these screws to secure the power supply. Attaching a Power Supply to the Power Supply Tray Note. Two power supply types can be attached to a power supply tray. 4 After the rack-mount flanges and the power supply are secured to the tray, mark the holes on the rack where the tray is to be installed. 5 Lift and position the tray until the rack-mount flanges are flush with the rack post. 6 Align the holes in the flanges with the rack holes that were marked earlier. 7 Once the holes are aligned, insert a rack mount screw (not provided) through the bottom hole of each flange. Tighten all screws until they are secure. Attaching the Power Supply Tray to the Rack Note. Be sure to install the screws in the bottom hole of each flange, as shown, before proceeding. 8 Once the screws at the bottom of each flange are secure, install the remaining rack mount screws. Be sure that all screws are securely tightened. page 3-8 OmniSwitch 6855 Series Hardware Users Guide September 2011
-
 1
1 -
2
-
3
-
4
-
5
-
6
-
7
-
8
-
9
-
10
-
11
-
12
-
13
-
14
-
15
-
16
-
17
-
18
-
19
-
20
-
21
-
22
-
23
-
24
-
25
-
26
-
27
-
28
-
29
-
30
-
31
-
32
-
33
-
34
-
35
-
36
-
37
-
38
-
39
-
40
-
41
-
42
-
43
-
44
-
45
-
46
-
47
-
48
-
49
-
50
-
51
-
52
-
53
-
54
-
55
-
56
-
57
-
58
-
59
-
60
-
61
-
62
-
63
-
64
-
65
-
66
-
67
-
68
-
69
-
70
-
71
-
72
-
73
-
74
-
75
-
76
-
77
-
78
-
 79
79 -
 80
80 -
 81
81 -
 82
82 -
 83
83 -
 84
84 -
 85
85 -
 86
86 -
 87
87 -
 88
88 -
 89
89 -
90
-
91
-
92
-
93
-
94
-
95
-
96
-
97
-
98
-
99
-
100
-
101
-
102
-
103
-
104
-
105
-
106
-
107
-
108
-
109
-
110
-
111
-
112
-
113
-
114
-
115
-
116
-
117
-
118
-
119
-
120
-
121
-
122
-
123
-
124
-
125
-
126
-
127
-
128
-
129
-
130
-
131
-
132
-
133
-
134
-
135
-
136
-
137
-
138
-
139
-
140
-
141
-
142
-
143
-
144
-
145
-
146
-
147
-
148
-
149
-
150
-
151
-
152
-
153
-
154
-
155
-
156
-
157
-
158
-
159
-
160
-
161
-
162
-
163
-
164
-
165
-
166
-
167
-
168
-
169
-
170
-
171
-
172
-
173
-
174
-
175
-
176
-
177
-
178
-
179
-
180
-
181
-
182
-
183
-
184
-
185
-
186
-
187
-
188
-
189
-
190
-
191
-
192
-
193
-
194
-
195
-
196
-
197
-
198
-
199
-
200
-
201
-
202
-
203
-
204
 |
 |
