Archos AV700 User Manual - Page 10
VIDEO - Recording Video Files - manual
 |
UPC - 690590507159
View all Archos AV700 manuals
Add to My Manuals
Save this manual to your list of manuals |
Page 10 highlights
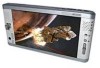
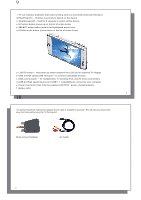
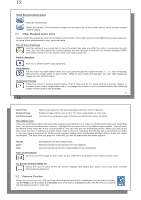
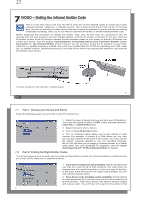
19 5 VIDEO - Recording Video Files With your TV docking pod properly connected to a VCR, cable box, or satellite receiver, making a recording is a simple affair. See the relevant chapter for instructions on connecting the TV docking pod to your television system. Pre-record Screen 1. Select VideoCorder on the main menu screen. In the prerecord screen, you should see movement on the sound level bar indicating that sound will be recorded. Adjust the sound level by clicking the LEFT/RIGHT buttons. Before starting the recording, you can adjust the recording parameters via the Setup action icon. Setup Parameters 2. In most situations, the video recording will work fine without your having to adjust the settings. However, by selecting the recording settings , you have access to a number of parameters that you can change before you start the recording. See the table below for descriptions. 20 19 During Recording 3. Click on the PLAY/PAUSE button to start the recording. While recording, you will see the length of time of the recording in the top left of the screen as well as a red "record" indicator. Click on the PLAY/PAUSE button again to pause the recording. Click on the STOP/ESC button to stop the recording. The AV 700 will take a few seconds to complete the proper saving of the .AVI video file. 5.1 Setting the Recording Parameters You can set the recording parameters manually to suit your specific needs. Click the action icon in the VideoCorder's pre-recording screen. Rename Auto Stop Rec Duration Pre-record Post-record Allows you to change the filename before the recording begins. On, Off. If set to On, the AV 700 will stop recording after the duration set in the next line. For example, you want to record a television show for two hours but do not want to stay around for the two hours to stop the recording. A recording that you start manually will last for 2 hours. If set to Off, the recording will continue until you click on the stop button or until the entire hard drive fills up. This is the duration of time your manual recording will last if Auto Stop Rec above is set to On. This is a safety margin added to the beginning of a scheduled recording which was set via the My Yahoo!® TV scheduler of your personal Yahoo!® calendar. It affects ONLY these recordings. This is just in case the clocks between your AV 700 and the broadcast station are different or if the broadcast station starts earlier than expected. This is a safety margin added to the end of a scheduled recording which was set via the My Yahoo!® TV scheduler of your personal calendar. It affects ONLY these recordings. This is just in case the clocks between your AV 700 and the broadcast station are different or if the broadcast station runs overtime. 20
-
 1
1 -
2
-
3
-
4
-
 5
5 -
 6
6 -
 7
7 -
 8
8 -
 9
9 -
 10
10 -
 11
11 -
 12
12 -
 13
13 -
 14
14 -
 15
15 -
16
-
17
-
18
-
19
-
20
-
21
-
22
-
23
-
24
-
25
-
26
-
27
-
28
-
29
-
30
-
31
-
32
-
33
-
34
-
35
-
36
-
37
-
38
-
39
-
40
-
41
-
42
-
43
-
44
-
45
-
46
-
47
-
48
-
49
-
50
-
51
-
52
-
53
-
54
-
55
 |
 |