Archos AV700 User Manual - Page 41
TV Docking Pod Description - firmware
 |
UPC - 690590507159
View all Archos AV700 manuals
Add to My Manuals
Save this manual to your list of manuals |
Page 41 highlights
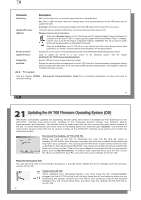
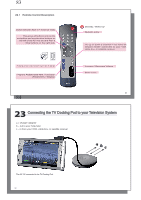
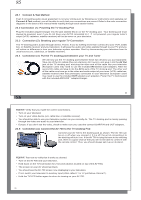
81 'Hard Drive' or 'Windows Device'? If your AV 700 is seen as a hard drive, then you simply need to drag the Update_AV700.AOS file onto this icon, and Windows® will place the file into the top most directory (root) of the AV 700. It should not be placed inside any folder within your AV 700. Once this file is copied, safely disconnect (refer to the chapter on Connecting/Disconnecting) the AV 700 from the computer. If your AV 700 is seen as a Windows® Device, then you will have to open the AV 700 Device in Windows® Explorer and drop the Update_AV700.AOS into the Data folder (not the Media folder). If there is already an older version of the Update_AV700.AOS file on your AV 700, Windows® will ask if you want to overwrite the current file. Click on Yes. Disconnect the AV 700 from your computer. Activate the Update Ensure that your AV 700 is still powered through the AC charger/adapter. Next, go to the System parameters from the Settings action icon and then move down to Update Firmware and click on it. The AV 700 will search for the .AOS file. Follow the on-screen instructions. When completed, the AV 700 will restart and you can go back to this screen to verify that you have updated the firmware to the new version. 81 82 22 TV Docking Pod Description By installing the TV Docking Pod, you have an easy way to connect and disconnect your AV 700 to or from your home entertainment system. Simply connect the pod's multi-connect plug to the AV 700 as needed. If you have scheduled television recordings to make, then connect the AV 700 to the pod and let it make the recording while you are away. If you want to make TV recordings from a place other than where your pod is connected, then you can purchase the "Audio-Video Travel kit" to bring along with your ARCHOS™ device and record from any other audio/video source. a AV input jack - use either of the AV cables b AV ouput jack - use either of the AV cables c S-Video in - input (you can use a standard s-video cable (not included) for your video input) d Adapter connection - connect the included power adapter here e Infrared Emitter jack - plug in the included infrared emitter if you want the AV 700 to control a VCR, cable box, or sat. receiver. 82
-
 1
1 -
2
-
3
-
4
-
5
-
6
-
7
-
8
-
9
-
10
-
11
-
12
-
13
-
14
-
15
-
16
-
17
-
18
-
19
-
20
-
21
-
22
-
23
-
24
-
25
-
26
-
27
-
28
-
29
-
30
-
31
-
32
-
33
-
34
-
35
-
 36
36 -
 37
37 -
 38
38 -
 39
39 -
 40
40 -
 41
41 -
 42
42 -
 43
43 -
 44
44 -
 45
45 -
 46
46 -
47
-
48
-
49
-
50
-
51
-
52
-
53
-
54
-
55
 |
 |
