Archos AV700 User Manual - Page 11
Where is the Recording Saved?, Copy Protection, Manually Setting the Scheduler - case
 |
UPC - 690590507159
View all Archos AV700 manuals
Add to My Manuals
Save this manual to your list of manuals |
Page 11 highlights
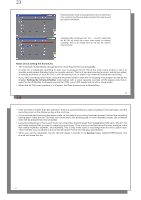
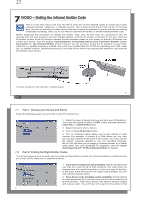
21 Source Format Resolution Bitrate Sampling Brightness Contrast Saturation Hue Reset Composite, S-Video, Auto. You can choose which video input you want the AV 700 to use. Normally, with a good video signal, you can set it to Auto, and the AV 700 will scan the two TV docking pod inputs to see which one is receiving video (AV In or S-Video). Auto, 4:3, 5:3, 16:9, 2.35. This is the aspect ratio of the screen that the AV 700 will record. You can set this manually, but in most cases you can just leave it on Auto. Optimal, VGA. Use this to set the resolution of the recorded image. You can leave this on Optimal. Optimal (512 x 384) will give the smoothest image quality, with the smallest file size. VGA (640 x 480) will give sharper images, which are less smooth during fast moving scenes. However, the file size is larger. 500 kb/s, 1000 kb/s, 1500kb/s, 2000 kb/s, 2500kb/s. Use this to set the encoding quality (similar to the idea of JPEG image quality settings). The higher the encoding rate, the higher the image quality but also more hard drive space will be used. Lower bit rates will use less hard drive space. 32kHz, 48kHz. The sound sampling rate. The higher value gives a higher quality sound but will take up more space on the hard drive. Use this to increase or decrease the recorded image brightness Use this to increase or decrease the recorded image contrast Use this to de-emphasize or saturate the colors in the recorded image Use this to change the color spectrum in the recorded image Change the above settings to the AV 700 default settings • Once you have finished changing the parameters, click Stop/escape button to return to the pre-record screen. • Concerning the video standard, the AV 700 will automatically recognize whether the incoming video signal is NTSC (American), SECAM, or PAL (European). There is no need to set anything. You will see the signal type, as well as the selected aspect ratio on the top left of the pre-recording screen. • Click the LEFT/RIGHT buttons to adjust the sound input level. Too far to the right will often give an overdriven distorted quality. Too far to the left may make for a very soft sound. Try a few recordings to get a sense of what is the best sound level. Do not let the headphone volume fool you. That can be adjusted independently with the UP/DOWN buttons. • If you would like to make a recording in another folder instead of the default "Video" folder, go to the desired folder via the main Video icon, then click on the Launch Videocorder action icon. 21 22 5.2 Where is the Recording Saved? The default location for video recordings is the folder called Video. If you click on the Video icon in the main menu, you will go to this folder. Notice that there is a Launch Videocorder action icon. Each time you use this button to record video instead of the VideoCorder icon in the main menu, you set the recording default location to the current folder. For example, you have created a folder called /Video/Television/Documentaries. If you go to this folder and then make a recording using the Launch Videocorder action icon, you will set the default record location to this folder. Now, each time you use the VideoCorder icon to start a recording, your recording will be saved in the folder /Video/Television/Documentaries. 5.3 Copy Protection The AV 700 video recording system is designed to respect the Macrovision® copyright protection system. If the source of your video is copy protected, the AV 700 will record in protected mode. You will see a "P" icon on the recording screen (not during playback) indicating that the file will be a protected file. Protected files can only be played back on the AV 700 that created it. The file will not play on a computer. Further, the playback of protected files will be limited to the built-in LCD screen and not to an external television. 5.4 Manually Setting the Scheduler If you would like to make a video recording for a future date or time, you can use the scheduler. You can find it in the main menu. You can program up to twenty different recordings up to one month in advance. Once you program your dates and times of recording, press the action button OK to set them. You must now put your AV 700 into standby mode by pressing on the red Standby/wake-up button on your ARCHOS™ remote control or just leave it alone. If left alone, the AV 700 will go on standby itself after a few minutes. 1. Click the Scheduler icon. 2. Select the line you want to edit using the UP and DOWN buttons, then click RIGHT to start editing. 3. Set each line to the desired date, time (and channel if you are using the Infrared emitter to control your VCR, cable box, or satellite receiver). 4. Click on the bottom action icon Edit program title and give a name of your choosing. Click on the save icon to save the program. Click on the STOP/ESC button to return to the previous screen. 5. DO NOT shut off the AV 700! Set the AV 700 to Standby (red 'standby' button on remote control) or go back to the main menu screen and allow it to automatically (after a couple minutes of inactivity) go into standby mode. 22
-
 1
1 -
2
-
3
-
4
-
5
-
 6
6 -
 7
7 -
 8
8 -
 9
9 -
 10
10 -
 11
11 -
 12
12 -
 13
13 -
 14
14 -
 15
15 -
 16
16 -
17
-
18
-
19
-
20
-
21
-
22
-
23
-
24
-
25
-
26
-
27
-
28
-
29
-
30
-
31
-
32
-
33
-
34
-
35
-
36
-
37
-
38
-
39
-
40
-
41
-
42
-
43
-
44
-
45
-
46
-
47
-
48
-
49
-
50
-
51
-
52
-
53
-
54
-
55
 |
 |