Archos Gmini 500 User Manual - Page 11
Select Source & Destination Files, hours of Lemans.avi, Change Settings, Target & Priority,
 |
View all Archos Gmini 500 manuals
Add to My Manuals
Save this manual to your list of manuals |
Page 11 highlights
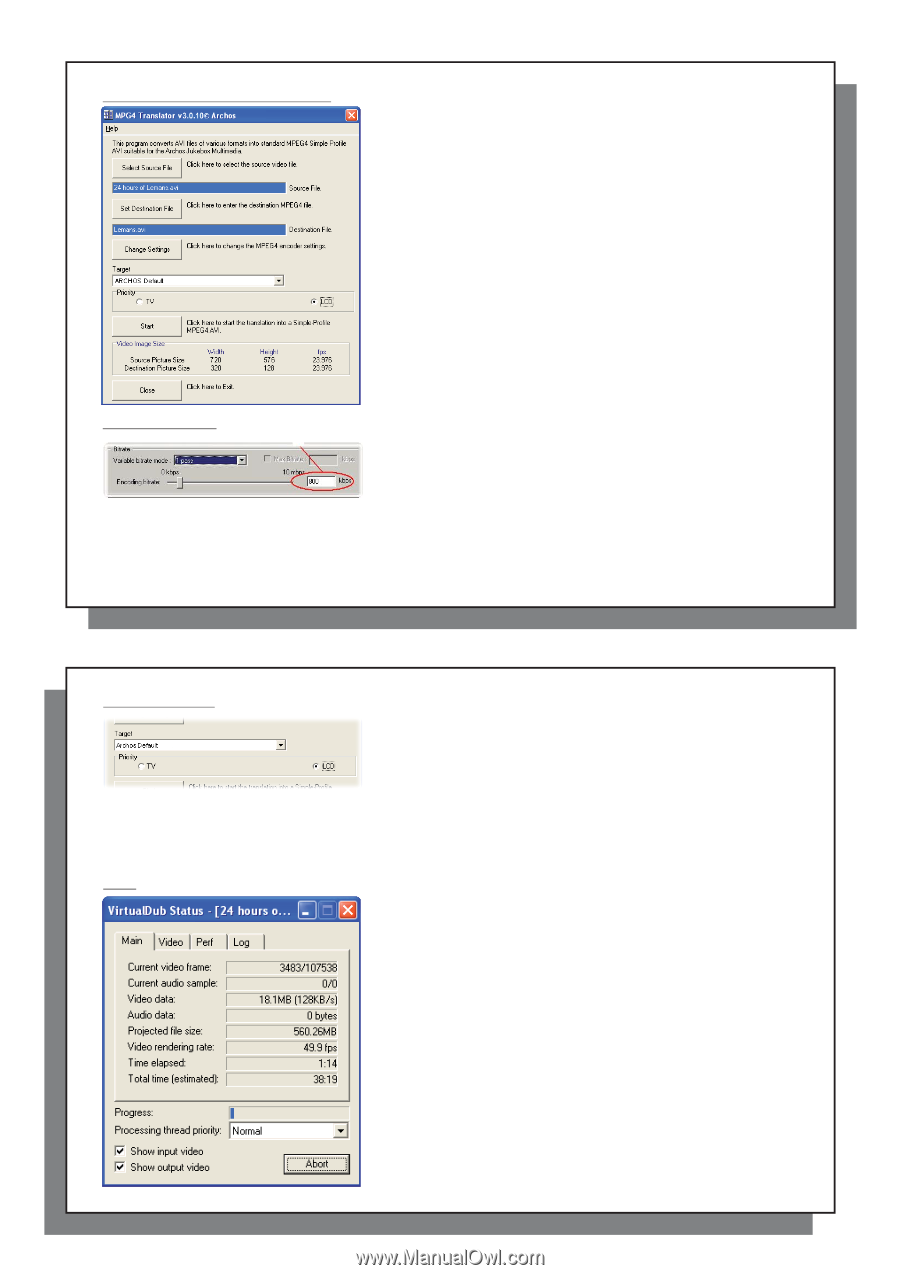
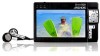
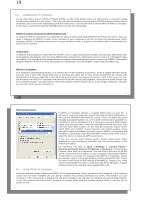
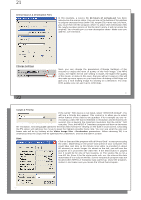
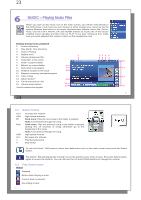
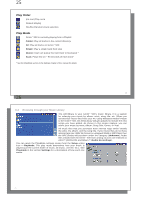
21 Select Source & Destination Files In this example, a source file 24 hours of Lemans.avi has been selected as the source video. You can see on the bottom of the window its original characteristics (width 720, height 576, frame rate 24). Next, you must then tell the program where to place (Set Destination file) the newly recoded version of the file (don't worry, it will not erase the original). You should give it a new descriptive name. Make sure you add the .avi extension. Change Settings 22 Next, you can change the parameters (Change Settings) of the encoder to adjust the level of quality of the final image. Like MP3 music, the higher the bit rate setting is made, the higher the quality of the music, or video in this case, that you will get. However, this will also take up more space on your hard drive. A setting of 900 kbps will give you a nice looking image for viewing on a television. For near DVD quality, you can set it up to 1200 kbps. 21 Target & Priority If the Gmini™ 500 device is not listed, select "ARCHOS Default". You will see a Priority box appear. This control is to allow you to select which feature of the video to be guarded. If for example you are reencoding a video file that is 800x600 in resolution and 30 frames per second, this is beyond the maximum resolution that the Gmini™ 500 can play. Thus, the MPEG-4 Translator program will have to decrease the resolution. Choosing LCD optimizes the final video format for viewing on the built in LCD screen. Choosing the TV option will optimize the movie to keep the highest possible frame rate. You can see what the size and frame rate will be by looking at the Video Image Size : Destination parameters. When choosing TV, it is understood that the output will be optimized for a television, and not the built-in screen. Start Click on Start and the program will call Virtual Dub™ to start processing the video. Depending on the power and speed of your computer, this could take real time (a 60 minute long video re-encoded in about 60 minutes) or much longer. As shown to the left, you will see the progress as it processes the video file. If the Start button is grayed out, it would be for one of two reasons. 1) The source file is not a true AVI file. Even if the file name ends with .avi, the internal file data determines if it is truly an AVI file. 2) The Virtual Dub program was not located when MPEG-4 Translator was started up. Close the program, restart it, and make sure you locate the Virtual Dub program. 22
-
 1
1 -
2
-
3
-
4
-
5
-
 6
6 -
 7
7 -
 8
8 -
 9
9 -
 10
10 -
 11
11 -
 12
12 -
 13
13 -
 14
14 -
 15
15 -
 16
16 -
17
-
18
-
19
-
20
-
21
-
22
-
23
-
24
-
25
-
26
-
27
-
28
-
29
-
30
-
31
-
32
-
33
-
34
-
35
-
36
-
37
-
38
-
39
-
40
-
41
-
42
-
43
 |
 |