Archos Gmini 500 User Manual - Page 26
Connecting/Disconnecting* the Gmini, to/from your PC - update
 |
View all Archos Gmini 500 manuals
Add to My Manuals
Save this manual to your list of manuals |
Page 26 highlights
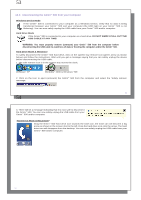
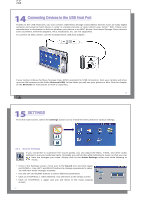
51 13 Connecting/Disconnecting* the Gmini™ 500 to/from your PC 13.1 USB Connection Type ('Hard Drive' or 'Windows Device') Your device comes configured as a Windows® Device and will be immediately recognized by your computer if you are running Windows® XP (with Service Pack 1 minimum) and Windows Media® Player 10. If you have another version of Windows®, not sure what version of Windows® XP you have, or if you are using a Macintosh®, then you will need to change the USB (Universal Serial Bus) Port setting on the Gmini™ 500. You will do this by going to the Settings action icon and then to System and USB Port and change it to 'Hard Drive'. 13.2 Connecting the Gmini™ 500 Connection order: See the sections below for your particular computer's operating system. 1) Connect the power adapter to the Gmini™ 500. 2) With your computer running, plug the USB cable into your computer. 3) With the Gmini™ 500 off, plug in the other end of the USB cable to the Gmini™ 500 USB Device port. 4) Turn on the Gmini™ 500. (If your computer asks to install a new driver for the new hardware, then you must unplug it and change the USB Port to Hard Drive.) * Note that when the Gmini™ 500 is connected to a computer, it will use more energy than usual. Your battery power will be consumed at a higher rate than normal. It is normal that the Gmini™ 500 will get hot. If the Gmini™ 500 looses power while connected to your computer you could damage your directory structure and/or loose data. Thus, you should always use the AC adapter when connected to your computer. Be careful to understand the disconnection procedure also since disconnecting incorrectly can lead to data loss or computer/Gmini™ 500 freeze up. The Gmini™ 500 is not compatible with Windows® NT, Windows® 95, or Windows® 98. While connected to your computer, the Gmini™ 500 buttons are blocked and are no longer functional. 51 52 Windows® XP Please verify** that you have Windows® XP and it is updated it to at least, Service Pack 1. You must also have Windows Media® Player 10 (WMP10) installed on your computer. This way, you can take advantage of connecting it as a 'Windows Device'. Connect it to your PC as enumerated above and you can then see the Gmini™ 500 in Windows® Explorer and WMP10. Without Windows® XP Service Pack 1 (a free update) or Windows Media Player® 10, you cannot use it as a Windows® recognized 'Device' and will have to follow the instructions for Windows® ME & 2000 below. ** Right-click on 'My Computer' select 'Properties', and then look in the tab labeled 'General'. It should say "Service Pack 1" or higher. Windows® ME and 2000 Attention: Before connecting the Gmini™ 500 to your computer with the USB cable, go to the setup action icon and then to System and USB Port and change it to 'Hard Drive'. When connected to your computer, the Gmini™ 500 will be recognized as an external Hard Drive and display automatically within a few seconds of being connected. You will see a new drive letter, such as E: in My Computer called Gmini™ 500. You can now use the hard drive called Gmini™ 500 like any other external hard drive. Simply access it using Windows® Explorer to drag and drop files to and from the Gmini™ 500's hard drive. Macintosh™ OS X If you have OS X, you must update to version 10.2.4 or newer. You must also change the Gmini™ 500's USB Port setting to 'Hard Drive'. From the main menu, go to the Settings action icon and then to System and USB Port and change it to 'Hard Drive'. You will now simply plug the Gmini™ 500 into your Macintosh® as enumerated above, and within a few seconds, the Gmini™ 500 will be recognized as a mass storage device (Hard Drive) and mount on the desktop. You can now use the hard drive called Gmini™ 500 like any other external hard drive. 52
-
 1
1 -
2
-
3
-
4
-
5
-
6
-
7
-
8
-
9
-
10
-
11
-
12
-
13
-
14
-
15
-
16
-
17
-
18
-
19
-
20
-
 21
21 -
 22
22 -
 23
23 -
 24
24 -
 25
25 -
 26
26 -
 27
27 -
 28
28 -
 29
29 -
 30
30 -
 31
31 -
32
-
33
-
34
-
35
-
36
-
37
-
38
-
39
-
40
-
41
-
42
-
43
 |
 |
