Bosch DVR-16L-100A Operation Manual - Page 103
Schedule setup
 |
View all Bosch DVR-16L-100A manuals
Add to My Manuals
Save this manual to your list of manuals |
Page 103 highlights
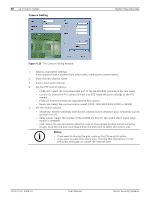
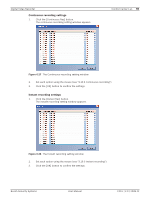
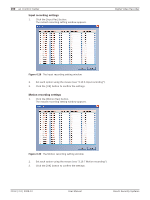
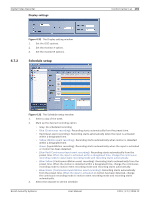
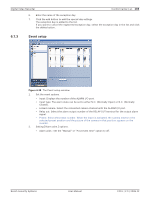
Digital Video Recorder Display settings 6.7.2 Figure 6.31 The Display setting window 1. Set the OSD options. 2. Set the monitor A option. 3. Set the monitor B options. Schedule setup Control Center | en 101 Figure 6.32 The Schedule setup window 1. Select a day of the week. 2. Mark up the desired recording option. • Gray: No scheduled recording • Blue (Continuous recording): Recording starts automatically from the preset time. • Red (Input event recording): Recording starts automatically when the input is activated within a designated time. • Yellow (Motion event recording): Recording starts automatically when motion is detected within a designated time. - Green (Input+Motion recording): Recording starts automatically when the input is activated or motion has been detected. • Blue+Red (Continuous+Input event recording): Recording starts automatically from the preset time. When the input is activated within a designated time, change the continuous recording mode to input event recording mode and recording starts automatically. • Blue+Yellow (Continuous+Motion event recording): Recording starts automatically from the preset time. When the motion is detected within a designated time, change the continuous recording mode to motion event recording mode and recording starts automatically. • Blue+Green (Continuous+Input+Motion event recording): Recording starts automatically from the preset time. When the input is activated or motion has been detected, change the continuous recording mode to motion event recording mode and recording starts automatically. 3. Select the channel to set the schedule. Bosch Security Systems User Manual F01U | 2.0 | 2008.12
-
 1
1 -
2
-
3
-
4
-
5
-
6
-
7
-
8
-
9
-
10
-
11
-
12
-
13
-
14
-
15
-
16
-
17
-
18
-
19
-
20
-
21
-
22
-
23
-
24
-
25
-
26
-
27
-
28
-
29
-
30
-
31
-
32
-
33
-
34
-
35
-
36
-
37
-
38
-
39
-
40
-
41
-
42
-
43
-
44
-
45
-
46
-
47
-
48
-
49
-
50
-
51
-
52
-
53
-
54
-
55
-
56
-
57
-
58
-
59
-
60
-
61
-
62
-
63
-
64
-
65
-
66
-
67
-
68
-
69
-
70
-
71
-
72
-
73
-
74
-
75
-
76
-
77
-
78
-
79
-
80
-
81
-
82
-
83
-
84
-
85
-
86
-
87
-
88
-
89
-
90
-
91
-
92
-
93
-
94
-
95
-
96
-
97
-
 98
98 -
 99
99 -
 100
100 -
 101
101 -
 102
102 -
 103
103 -
 104
104 -
 105
105 -
 106
106 -
 107
107 -
 108
108 -
109
-
110
-
111
-
112
-
113
-
114
-
115
-
116
-
117
-
118
-
119
-
120
-
121
-
122
-
123
-
124
-
125
-
126
-
127
-
128
-
129
-
130
-
131
-
132
-
133
-
134
-
135
-
136
-
137
-
138
-
139
-
140
 |
 |
