Bosch DVR-16L-100A Operation Manual - Page 93
Changing to a picture in a preset position, To clear the preset position, To tour the preset
 |
View all Bosch DVR-16L-100A manuals
Add to My Manuals
Save this manual to your list of manuals |
Page 93 highlights
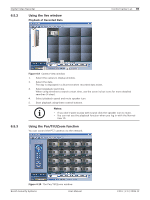
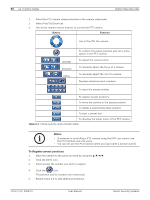
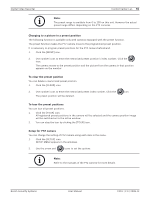
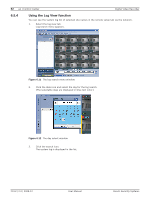
Digital Video Recorder Control Center | en 91 Note: The preset range is available from 0 to 255 on this unit. However the actual preset range differs depending on the PTZ cameras. Changing to a picture in a preset position The following function is available only with cameras equipped with the preset function. The preset function makes the PTZ camera move to the programmed preset position. It is necessary to program preset positions for the PTZ camera beforehand. 1. Click the [MOVE] icon. 2. Use number icons to enter the memorized preset position's index number, Click the icon. The camera moves to the preset position and the picture from the camera in that position appears on the monitor. To clear the preset position You can delete a memorized preset position. 1. Click the [CLEAR] icon. 2. Use number icons to enter the memorized preset index number, Click the The preset position will be deleted. icon. To tour the preset positions You can tour all preset positions. 1. Click the [TOUR] icon. All registered preset positions in the camera will be selected and the camera position image will be switched on to the active window. 2. You can stop the tour by clicking the [TOUR] icon. Setup for PTZ camera You can change the setting of PTZ camera using each item in the menu. 1. Click the [SETUP] icon. SETUP MENU appears in the windows. 2. Use the arrow and icons to set the options. Note: Refer to the manuals of the PTZ camera for more details. Bosch Security Systems User Manual F01U | 2.0 | 2008.12
-
 1
1 -
2
-
3
-
4
-
5
-
6
-
7
-
8
-
9
-
10
-
11
-
12
-
13
-
14
-
15
-
16
-
17
-
18
-
19
-
20
-
21
-
22
-
23
-
24
-
25
-
26
-
27
-
28
-
29
-
30
-
31
-
32
-
33
-
34
-
35
-
36
-
37
-
38
-
39
-
40
-
41
-
42
-
43
-
44
-
45
-
46
-
47
-
48
-
49
-
50
-
51
-
52
-
53
-
54
-
55
-
56
-
57
-
58
-
59
-
60
-
61
-
62
-
63
-
64
-
65
-
66
-
67
-
68
-
69
-
70
-
71
-
72
-
73
-
74
-
75
-
76
-
77
-
78
-
79
-
80
-
81
-
82
-
83
-
84
-
85
-
86
-
87
-
 88
88 -
 89
89 -
 90
90 -
 91
91 -
 92
92 -
 93
93 -
 94
94 -
 95
95 -
 96
96 -
 97
97 -
 98
98 -
99
-
100
-
101
-
102
-
103
-
104
-
105
-
106
-
107
-
108
-
109
-
110
-
111
-
112
-
113
-
114
-
115
-
116
-
117
-
118
-
119
-
120
-
121
-
122
-
123
-
124
-
125
-
126
-
127
-
128
-
129
-
130
-
131
-
132
-
133
-
134
-
135
-
136
-
137
-
138
-
139
-
140
 |
 |
