Brother International 2700CN Network Users Manual - English - Page 16
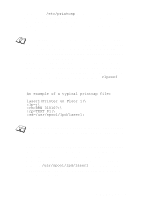
HP-UX Configuration, Printers and Plotters, LP Spooler, Actions, Add Remote Printer/Plotter
 |
UPC - 012502607670
View all Brother International 2700CN manuals
Add to My Manuals
Save this manual to your list of manuals |
Page 16 highlights
HP-UX Configuration In the case of HP-UX10.xx, the sam program is used to set up the remote printer. The steps are as follows: 1 Execute the sam program. From the list of options, select Printers and Plotters. 2 Select LP Spooler. 3 Select Printers and Plotters. 4 Select Actions and then Add Remote Printer/Plotter. 5 Enter any name as the Printer Name (this will be the name of the print queue). 6 Enter the IP address of the print server as the Remote System Name. 7 Enter the desired print server service name as the Remote Printer Name. 8 Check the box next to Remote Printer is on BSD system. 9 You may accept the default values for the remaining items. 10 Click OK to configure the printer. You should now be able to print using the lp-d command with the printer name. If you are using the HP distributed print service, the configuration procedure is slightly different because you are sending the print jobs to a file server, which in turn spools the job to the print server. You must therefore know the name of the file server (spooler host) in addition to the above information. You will add a physical and a remote printer, and then assign a logical printer to the remote printer (a unique name that does not match any other name). To print, use the lp -d command with the logical printer name. 1 - 7 UNIX PRINTING
-
 1
1 -
2
-
3
-
4
-
5
-
6
-
7
-
8
-
9
-
10
-
 11
11 -
 12
12 -
 13
13 -
 14
14 -
 15
15 -
 16
16 -
 17
17 -
 18
18 -
 19
19 -
 20
20 -
 21
21 -
22
-
23
-
24
-
25
-
26
-
27
-
28
-
29
-
30
-
31
-
32
-
33
-
34
-
35
-
36
-
37
-
38
-
39
-
40
-
41
-
42
-
43
-
44
-
45
-
46
-
47
-
48
-
49
-
50
-
51
-
52
-
53
-
54
-
55
-
56
-
57
-
58
-
59
-
60
-
61
-
62
-
63
-
64
-
65
-
66
-
67
-
68
-
69
-
70
-
71
-
72
-
73
-
74
-
75
-
76
-
77
-
78
-
79
-
80
-
81
-
82
-
83
-
84
-
85
-
86
-
87
-
88
-
89
-
90
-
91
-
92
-
93
-
94
-
95
-
96
-
97
-
98
-
99
-
100
-
101
-
102
-
103
-
104
-
105
-
106
-
107
-
108
-
109
-
110
-
111
-
112
-
113
-
114
-
115
-
116
-
117
-
118
-
119
-
120
-
121
-
122
-
123
-
124
-
125
-
126
-
127
-
128
-
129
-
130
-
131
-
132
-
133
-
134
 |
 |
