Brother International 2700CN Network Users Manual - English - Page 18
Sun Solaris 2.x Configuration, 9 UNIX PRINTING
 |
UPC - 012502607670
View all Brother International 2700CN manuals
Add to My Manuals
Save this manual to your list of manuals |
Page 18 highlights
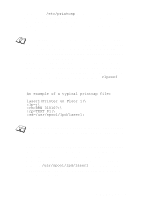
The procedure for pre-V4.0 systems is as follows. 1 Enter smit and select devices. 2 Select printer/plotter. 3 Select manage remote printer subsystem. 4 Select client services. 5 Select remote printer queues. 6 Select add a remote queue. 7 Enter the following remote queue settings: ■ Name of queue to add (user selectable). ■ Activate the queue (Yes). ■ Destination host (print server name; must match name in / etc/hosts file or use the print server IP address) ■ Name of queue on remote printer (print server binary or text service name, eg. BINARY_P1 or TEXT_P1). ■ Name of device to add (user selectable; for example lp0). Sun Solaris 2.x Configuration Sun Solaris 2.x uses the lpsystem and lpadmin programs for remote printer configuration: lpsystem -t bsd prnservername lpadmin -p queue -s prnservername!prnserverservice accept queue (not required on newer Solaris systems) enable queue (not required on newer Solaris systems) Where queue is the name of the local print queue. prnservername is the name of the print server (must match the entry in the /etc/hosts file or IP address). prnserverservice is the print server BINARY_P1 or TEXT_P1 service. 1 - 9 UNIX PRINTING
-
 1
1 -
2
-
3
-
4
-
5
-
6
-
7
-
8
-
9
-
10
-
11
-
12
-
 13
13 -
 14
14 -
 15
15 -
 16
16 -
 17
17 -
 18
18 -
 19
19 -
 20
20 -
 21
21 -
 22
22 -
 23
23 -
24
-
25
-
26
-
27
-
28
-
29
-
30
-
31
-
32
-
33
-
34
-
35
-
36
-
37
-
38
-
39
-
40
-
41
-
42
-
43
-
44
-
45
-
46
-
47
-
48
-
49
-
50
-
51
-
52
-
53
-
54
-
55
-
56
-
57
-
58
-
59
-
60
-
61
-
62
-
63
-
64
-
65
-
66
-
67
-
68
-
69
-
70
-
71
-
72
-
73
-
74
-
75
-
76
-
77
-
78
-
79
-
80
-
81
-
82
-
83
-
84
-
85
-
86
-
87
-
88
-
89
-
90
-
91
-
92
-
93
-
94
-
95
-
96
-
97
-
98
-
99
-
100
-
101
-
102
-
103
-
104
-
105
-
106
-
107
-
108
-
109
-
110
-
111
-
112
-
113
-
114
-
115
-
116
-
117
-
118
-
119
-
120
-
121
-
122
-
123
-
124
-
125
-
126
-
127
-
128
-
129
-
130
-
131
-
132
-
133
-
134
 |
 |