Brother International 4000CN Users Manual - English - Page 150
down firmly to rotate the levers forward, the toner seal diagonally may tear
 |
UPC - 012502601616
View all Brother International 4000CN manuals
Add to My Manuals
Save this manual to your list of manuals |
Page 150 highlights
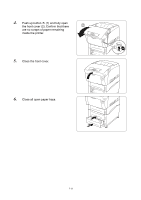
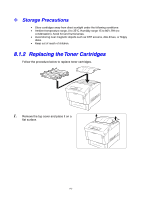
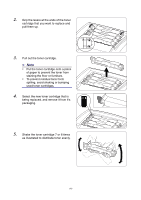
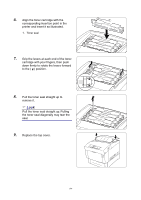
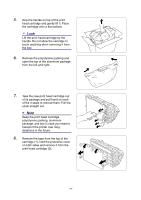
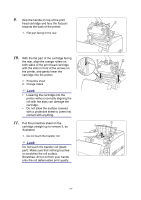
6. Align the toner cartridge with the corresponding insertion point in the printer and insert it as illustrated. 1. Toner seal 7. Grip the levers at each end of the toner cartridge with your fingers, then push down firmly to rotate the levers forward to the ( ) position. 8. Pull the toner seal straight up to remove it. Look Pull the toner seal straight up. Pulling 0 the toner seal diagonally may tear the seal. 9. Replace the top cover. 8-4
-
 1
1 -
2
-
3
-
4
-
5
-
6
-
7
-
8
-
9
-
10
-
11
-
12
-
13
-
14
-
15
-
16
-
17
-
18
-
19
-
20
-
21
-
22
-
23
-
24
-
25
-
26
-
27
-
28
-
29
-
30
-
31
-
32
-
33
-
34
-
35
-
36
-
37
-
38
-
39
-
40
-
41
-
42
-
43
-
44
-
45
-
46
-
47
-
48
-
49
-
50
-
51
-
52
-
53
-
54
-
55
-
56
-
57
-
58
-
59
-
60
-
61
-
62
-
63
-
64
-
65
-
66
-
67
-
68
-
69
-
70
-
71
-
72
-
73
-
74
-
75
-
76
-
77
-
78
-
79
-
80
-
81
-
82
-
83
-
84
-
85
-
86
-
87
-
88
-
89
-
90
-
91
-
92
-
93
-
94
-
95
-
96
-
97
-
98
-
99
-
100
-
101
-
102
-
103
-
104
-
105
-
106
-
107
-
108
-
109
-
110
-
111
-
112
-
113
-
114
-
115
-
116
-
117
-
118
-
119
-
120
-
121
-
122
-
123
-
124
-
125
-
126
-
127
-
128
-
129
-
130
-
131
-
132
-
133
-
134
-
135
-
136
-
137
-
138
-
139
-
140
-
141
-
142
-
143
-
144
-
 145
145 -
 146
146 -
 147
147 -
 148
148 -
 149
149 -
 150
150 -
 151
151 -
 152
152 -
 153
153 -
 154
154 -
 155
155 -
156
-
157
-
158
-
159
-
160
-
161
-
162
-
163
-
164
-
165
-
166
-
167
-
168
-
169
-
170
-
171
-
172
-
173
-
174
-
175
-
176
-
177
-
178
-
179
-
180
-
181
-
182
-
183
 |
 |

8-4
6.
Align the toner cartridge with the
corresponding insertion point in the
printer and insert it as illustrated.
1. Toner seal
7.
Grip the levers at each end of the toner
cartridge with your fingers, then push
down firmly to rotate the levers forward
to the (
) position.
8.
Pull the toner seal straight up to
remove it.
)
Look
Pull the toner seal straight up. Pulling
the toner seal diagonally may tear the
seal.
9.
Replace the top cover.