Brother International 4000CN Users Manual - English - Page 70
Duplex Printing, Printer Driver Settings (for duplex printing on plain paper)
 |
UPC - 012502601616
View all Brother International 4000CN manuals
Add to My Manuals
Save this manual to your list of manuals |
Page 70 highlights
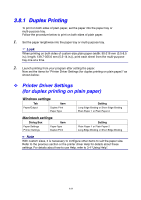
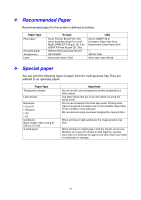
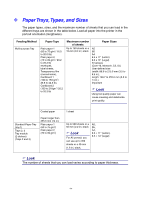
3.8.1 Duplex Printing To print on both sides of plain paper, set the paper into the paper tray or multi-purpose tray. Follow the procedure below to print on both sides of plain paper. 1. Set the paper lengthwise into the paper tray or multi-purpose tray. Look When printing on both sides of custom-size plain paper (width: 90-216 mm (3.5-8.5 9 in.); length: 139.7-355.6 mm (5.5-14 in.)), print each sheet from the multi-purpose tray one at a time. 2. Launch printing from your program after setting the paper. Now set the items for "Printer Driver Settings (for duplex printing on plain paper)" as shown below: Printer Driver Settings (for duplex printing on plain paper) Windows settings Tab Item Paper/Output Duplex Print Paper Type Setting Long Edge Binding or Short Edge Binding Plain Paper 1 or Plain Paper 2 Macintosh settings Dialog Box Item Paper Settings Printer Settings Paper Type Duplex Print Setting Plain Paper 1 or Plain Paper 2 Long Edge Binding or Short Edge Binding ✏ Note With custom sizes, it is necessary to configure other items to suit the paper size. Refer to the previous section or the printer driver Help for details about these settings. For details about how to use Help, refer to 3.4 "Using Help". 3-28
-
 1
1 -
2
-
3
-
4
-
5
-
6
-
7
-
8
-
9
-
10
-
11
-
12
-
13
-
14
-
15
-
16
-
17
-
18
-
19
-
20
-
21
-
22
-
23
-
24
-
25
-
26
-
27
-
28
-
29
-
30
-
31
-
32
-
33
-
34
-
35
-
36
-
37
-
38
-
39
-
40
-
41
-
42
-
43
-
44
-
45
-
46
-
47
-
48
-
49
-
50
-
51
-
52
-
53
-
54
-
55
-
56
-
57
-
58
-
59
-
60
-
61
-
62
-
63
-
64
-
 65
65 -
 66
66 -
 67
67 -
 68
68 -
 69
69 -
 70
70 -
 71
71 -
 72
72 -
 73
73 -
 74
74 -
 75
75 -
76
-
77
-
78
-
79
-
80
-
81
-
82
-
83
-
84
-
85
-
86
-
87
-
88
-
89
-
90
-
91
-
92
-
93
-
94
-
95
-
96
-
97
-
98
-
99
-
100
-
101
-
102
-
103
-
104
-
105
-
106
-
107
-
108
-
109
-
110
-
111
-
112
-
113
-
114
-
115
-
116
-
117
-
118
-
119
-
120
-
121
-
122
-
123
-
124
-
125
-
126
-
127
-
128
-
129
-
130
-
131
-
132
-
133
-
134
-
135
-
136
-
137
-
138
-
139
-
140
-
141
-
142
-
143
-
144
-
145
-
146
-
147
-
148
-
149
-
150
-
151
-
152
-
153
-
154
-
155
-
156
-
157
-
158
-
159
-
160
-
161
-
162
-
163
-
164
-
165
-
166
-
167
-
168
-
169
-
170
-
171
-
172
-
173
-
174
-
175
-
176
-
177
-
178
-
179
-
180
-
181
-
182
-
183
 |
 |
