Brother International 4000CN Users Manual - English - Page 30
After printing the color registration chart, do not turn
 |
UPC - 012502601616
View all Brother International 4000CN manuals
Add to My Manuals
Save this manual to your list of manuals |
Page 30 highlights
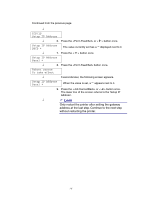
Continued from the previous page. ↓ Enter Number Y= 0 M= 0 C= 0 4. Using the < > or < > buttons, press the buttons until ↓ you reach the value (for example, +3) displayed on the chart. Enter Number Y=+3 M= 0 C= 0 ↓ 5. Press the < > button once and move the cursor to Enter Number Y=+3 M= 0 C= 0 ↓ 6. Repeat steps 4 and 5 to continue setting the color registration. Enter Number Y=+3 M=+1 C=+2 ↓ 7. Press the button once. Correction Chart Ready to Print 8. Press the button once. The color registration chart is printed with the new values. When printing is finished, the print screen reappears. 9. Color registration adjustment is complete when the straightest Y (yellow), M (magenta), and C (Cyan) lines are next to the '0' line. ✏ Note After printing the color registration chart, do not turn off the printer until the printer motor has stopped running. 1-3
-
 1
1 -
2
-
3
-
4
-
5
-
6
-
7
-
8
-
9
-
10
-
11
-
12
-
13
-
14
-
15
-
16
-
17
-
18
-
19
-
20
-
21
-
22
-
23
-
24
-
 25
25 -
 26
26 -
 27
27 -
 28
28 -
 29
29 -
 30
30 -
 31
31 -
 32
32 -
 33
33 -
 34
34 -
 35
35 -
36
-
37
-
38
-
39
-
40
-
41
-
42
-
43
-
44
-
45
-
46
-
47
-
48
-
49
-
50
-
51
-
52
-
53
-
54
-
55
-
56
-
57
-
58
-
59
-
60
-
61
-
62
-
63
-
64
-
65
-
66
-
67
-
68
-
69
-
70
-
71
-
72
-
73
-
74
-
75
-
76
-
77
-
78
-
79
-
80
-
81
-
82
-
83
-
84
-
85
-
86
-
87
-
88
-
89
-
90
-
91
-
92
-
93
-
94
-
95
-
96
-
97
-
98
-
99
-
100
-
101
-
102
-
103
-
104
-
105
-
106
-
107
-
108
-
109
-
110
-
111
-
112
-
113
-
114
-
115
-
116
-
117
-
118
-
119
-
120
-
121
-
122
-
123
-
124
-
125
-
126
-
127
-
128
-
129
-
130
-
131
-
132
-
133
-
134
-
135
-
136
-
137
-
138
-
139
-
140
-
141
-
142
-
143
-
144
-
145
-
146
-
147
-
148
-
149
-
150
-
151
-
152
-
153
-
154
-
155
-
156
-
157
-
158
-
159
-
160
-
161
-
162
-
163
-
164
-
165
-
166
-
167
-
168
-
169
-
170
-
171
-
172
-
173
-
174
-
175
-
176
-
177
-
178
-
179
-
180
-
181
-
182
-
183
 |
 |
