Brother International 4000CN Users Manual - English - Page 31
Configuring the Printer on a Network, 1.2.1 Setting an IP Address
 |
UPC - 012502601616
View all Brother International 4000CN manuals
Add to My Manuals
Save this manual to your list of manuals |
Page 31 highlights
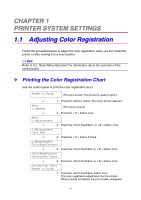
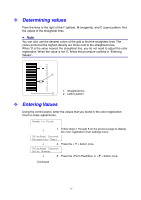
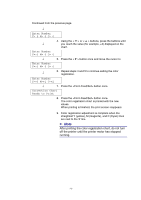
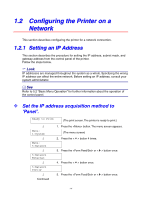
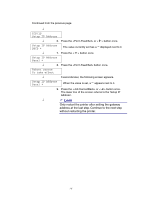
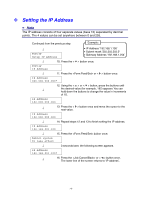
1.2 Configuring the Printer on a Network This section describes configuring the printer for a network connection. 1.2.1 Setting an IP Address This section describes the procedure for setting the IP address, subnet mask, and gateway address from the control panel of the printer. Follow the steps below. Look IP addresses are managed throughout the system as a whole. Specifying the wrong 0 IP address can affect the entire network. Before setting an IP address, consult your system administrator. See Refer to 5.2 "Basic Menu Operation" for further information about the operation of the control panel. Set the IP address acquisition method to 'Panel'. Ready to Print (The print screen. The printer is ready to print.) ↓ Menu: 1:System ↓ Menu: 5:Network ↓ 5:Network Ethernet ↓ 5:Network TCP/IP ↓ Continued 1. Press the button. The menu screen appears. (The menu screen) 2. Press the < > button 4 times. 3. Press the or < > button once. 4. Press the < > button once. 5. Press the or < > button once. 1-4
-
 1
1 -
2
-
3
-
4
-
5
-
6
-
7
-
8
-
9
-
10
-
11
-
12
-
13
-
14
-
15
-
16
-
17
-
18
-
19
-
20
-
21
-
22
-
23
-
24
-
25
-
 26
26 -
 27
27 -
 28
28 -
 29
29 -
 30
30 -
 31
31 -
 32
32 -
 33
33 -
 34
34 -
 35
35 -
 36
36 -
37
-
38
-
39
-
40
-
41
-
42
-
43
-
44
-
45
-
46
-
47
-
48
-
49
-
50
-
51
-
52
-
53
-
54
-
55
-
56
-
57
-
58
-
59
-
60
-
61
-
62
-
63
-
64
-
65
-
66
-
67
-
68
-
69
-
70
-
71
-
72
-
73
-
74
-
75
-
76
-
77
-
78
-
79
-
80
-
81
-
82
-
83
-
84
-
85
-
86
-
87
-
88
-
89
-
90
-
91
-
92
-
93
-
94
-
95
-
96
-
97
-
98
-
99
-
100
-
101
-
102
-
103
-
104
-
105
-
106
-
107
-
108
-
109
-
110
-
111
-
112
-
113
-
114
-
115
-
116
-
117
-
118
-
119
-
120
-
121
-
122
-
123
-
124
-
125
-
126
-
127
-
128
-
129
-
130
-
131
-
132
-
133
-
134
-
135
-
136
-
137
-
138
-
139
-
140
-
141
-
142
-
143
-
144
-
145
-
146
-
147
-
148
-
149
-
150
-
151
-
152
-
153
-
154
-
155
-
156
-
157
-
158
-
159
-
160
-
161
-
162
-
163
-
164
-
165
-
166
-
167
-
168
-
169
-
170
-
171
-
172
-
173
-
174
-
175
-
176
-
177
-
178
-
179
-
180
-
181
-
182
-
183
 |
 |
