Brother International 4000CN Users Manual - English - Page 28
PRINTER SYSTEM SETTINGS, 1.1 Adjusting Color Registration
 |
UPC - 012502601616
View all Brother International 4000CN manuals
Add to My Manuals
Save this manual to your list of manuals |
Page 28 highlights
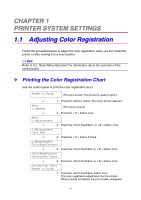
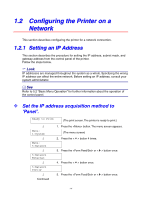
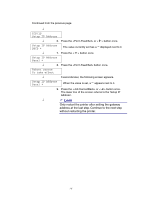
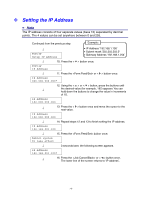
CHAPTER 1 PRINTER SYSTEM SETTINGS 1.1 Adjusting Color Registration Follow the procedure below to adjust the color registration when you first install the printer or after moving it to a new location. See Refer to 5.2 "Basic Menu Operation" for information about the operation of the control panel. Printing the Color Registration Chart Use the control panel to print the color registration chart. Ready to Print (The print screen. The printer is ready to print.) ↓ 1. Press the button. The menu screen appears. Menu 1:System (The menu screen) ↓ 2. Press the < > button once. Menu 2:Maintenance ↓ 3. Press the or < > button once. 2:Maintenance Init NVM ↓ 4. Press the < > button 3 times. 2:Maintenance ColorRegiCorrect ↓ 5. Press the or < > button once. ColorRegiCorrect Correction Chart ↓ 6. Press the or < > button once. Correction Chart Ready to Print 7. Press the button once. The color registration adjustment chart is printed. When printing is finished, the print screen reappears. 1-1
-
 1
1 -
2
-
3
-
4
-
5
-
6
-
7
-
8
-
9
-
10
-
11
-
12
-
13
-
14
-
15
-
16
-
17
-
18
-
19
-
20
-
21
-
22
-
 23
23 -
 24
24 -
 25
25 -
 26
26 -
 27
27 -
 28
28 -
 29
29 -
 30
30 -
 31
31 -
 32
32 -
 33
33 -
34
-
35
-
36
-
37
-
38
-
39
-
40
-
41
-
42
-
43
-
44
-
45
-
46
-
47
-
48
-
49
-
50
-
51
-
52
-
53
-
54
-
55
-
56
-
57
-
58
-
59
-
60
-
61
-
62
-
63
-
64
-
65
-
66
-
67
-
68
-
69
-
70
-
71
-
72
-
73
-
74
-
75
-
76
-
77
-
78
-
79
-
80
-
81
-
82
-
83
-
84
-
85
-
86
-
87
-
88
-
89
-
90
-
91
-
92
-
93
-
94
-
95
-
96
-
97
-
98
-
99
-
100
-
101
-
102
-
103
-
104
-
105
-
106
-
107
-
108
-
109
-
110
-
111
-
112
-
113
-
114
-
115
-
116
-
117
-
118
-
119
-
120
-
121
-
122
-
123
-
124
-
125
-
126
-
127
-
128
-
129
-
130
-
131
-
132
-
133
-
134
-
135
-
136
-
137
-
138
-
139
-
140
-
141
-
142
-
143
-
144
-
145
-
146
-
147
-
148
-
149
-
150
-
151
-
152
-
153
-
154
-
155
-
156
-
157
-
158
-
159
-
160
-
161
-
162
-
163
-
164
-
165
-
166
-
167
-
168
-
169
-
170
-
171
-
172
-
173
-
174
-
175
-
176
-
177
-
178
-
179
-
180
-
181
-
182
-
183
 |
 |
