Brother International BES-100E BE-100 Workbook - English - Page 62
Trims and Connections
 |
View all Brother International BES-100E manuals
Add to My Manuals
Save this manual to your list of manuals |
Page 62 highlights
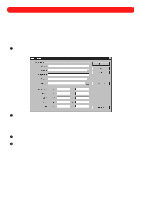
Chapter 25: Trims and Connections s Specifying character connections The way that individual characters within a selected text shape are connected to each other can be specified by choosing one the following Glyph connection settings (on the Commands tab of the Text Properties dialog box). With these settings, you could, for example, specify that the thread between each letter in a name will be trimmed. NOTE: To specify how words within text or the various shapes within the design are connected, see Specifying design shape connections below. Trim The thread connecting the characters is cut. Feed A long piece of thread is left between the characters. Run Running stitches are sewn between the characters. Auto BE-100 selects between Trim and Feed, depending on the setting in the Auto connections group box. The default setting is 0.25". The Auto connections group box is located on the Stitch Handling tab of the Design Info dialog box (displayed by clicking Design Info on the File drop-down menu). To specify how characters within a text shape are connected: 1 Using the Move tool ( ), select the text shape that you wish to change. "Dancing ants" (moving dashes) appear around the shape. 2 Press the Enter key. The Text Properties dialog box appears. 3 In the Glyph connection group box on the Commands tab, select the desired setting. 4 Click the OK button. s Specifying design shape connections The way that words within a text shape or the way that design shapes are connected can be specified by choosing one the following Connection settings (on the Commands tab of the Properties dialog box). For example, by selecting Feed, you could specify that a jump stitch is sewn between each word in a text shape. Trim The thread connecting the design shapes is cut. Feed A long piece of thread is left between the design shapes. Run Running stitches are sewn between the design shapes. Auto BE-100 selects between Trim and Feed, depending on the setting in the Auto connections group box on the Stitch Handling tab of the Design Info dialog box (displayed by clicking Design Info on the File drop-down menu). To specify how a design shape is connected to the next one: 1 Using the Move tool ( around the shape. ), select the design shape that you wish to change. "Dancing ants" appear 2 Press the Enter key. The Properties dialog box appears. 3 In the Connection group box on the Commands tab, select the desired setting. 4 Click the OK button. 59
-
 1
1 -
2
-
3
-
4
-
5
-
6
-
7
-
8
-
9
-
10
-
11
-
12
-
13
-
14
-
15
-
16
-
17
-
18
-
19
-
20
-
21
-
22
-
23
-
24
-
25
-
26
-
27
-
28
-
29
-
30
-
31
-
32
-
33
-
34
-
35
-
36
-
37
-
38
-
39
-
40
-
41
-
42
-
43
-
44
-
45
-
46
-
47
-
48
-
49
-
50
-
51
-
52
-
53
-
54
-
55
-
56
-
 57
57 -
 58
58 -
 59
59 -
 60
60 -
 61
61 -
 62
62 -
 63
63 -
 64
64 -
 65
65 -
 66
66 -
 67
67 -
68
-
69
-
70
-
71
-
72
-
73
-
74
-
75
-
76
-
77
-
78
-
79
-
80
-
81
-
82
-
83
-
84
-
85
-
86
-
87
-
88
-
89
-
90
-
91
-
92
-
93
-
94
-
95
-
96
-
97
-
98
-
99
-
100
-
101
-
102
-
103
-
104
-
105
-
106
-
107
-
108
-
109
-
110
-
111
-
112
-
113
-
114
-
115
-
116
-
117
-
118
-
119
 |
 |