Brother International BES-100E BE-100 Workbook - English - Page 92
Setting Up the Printout
 |
View all Brother International BES-100E manuals
Add to My Manuals
Save this manual to your list of manuals |
Page 92 highlights
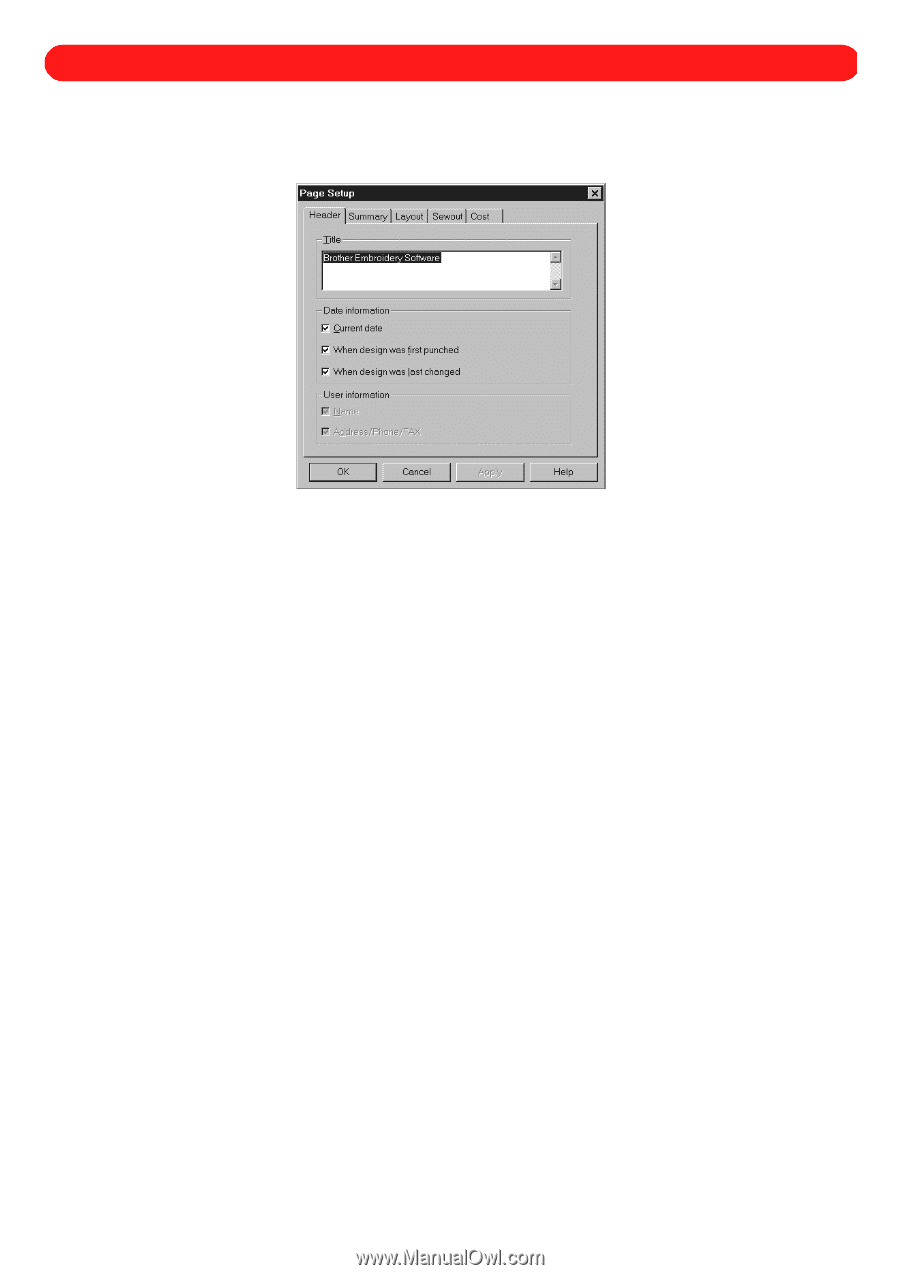
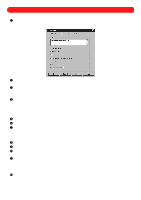
Chapter 40: Setting Up the Printout Page To setup the design printout: 1 On the File drop-down menu, click Page Setup. The Page Setup dialog box appears. Figure 118 2 On the Header tab, type the name that should be printed in the Title box, usually the company name and address. 3 In the Date information and User information group boxes, select the desired items to be printed. NOTE: If you do not wish to print an item, clear the check box for the item. The check mark will disappear. 4 On the Summary tab, select the desired items to be printed. NOTE: If you do not wish to print an item, clear the check box for the item. The check mark will disappear. If there is a check mark in front of an item in the Customer information group box, but information has not been entered into the database for that item, no information will be printed. 5 On the Layout tab, select what will be printed in the Page group box. 6 In the Margins group box, select the position of the margins. 7 On the Sewout tab, select the print size in the Print size group box. NOTE: To specify a magnification, clear the Auto check box. The check mark will disappear, and the magnification value will be 100%. To change this, enter a value in the Magnification (%) box. The design scale is printed at the lower-right side of the printout. 8 In the Color sequence group box, select how the color sequence is printed. 9 In the Detail group box, select if only the stitch data, only the outline data, or both is printed. 0 In the Thread usage group box, select if the amount of thread used per color per design or the amount of bobbin thread used per design is printed. A On the Cost tab, select the desired items to be printed. NOTE: If you do not wish to print an item, clear the check box for the item. The check mark will disappear. The selected settings are retained for future printouts, unless the user changes them. B Click the OK button. 89
-
 1
1 -
2
-
3
-
4
-
5
-
6
-
7
-
8
-
9
-
10
-
11
-
12
-
13
-
14
-
15
-
16
-
17
-
18
-
19
-
20
-
21
-
22
-
23
-
24
-
25
-
26
-
27
-
28
-
29
-
30
-
31
-
32
-
33
-
34
-
35
-
36
-
37
-
38
-
39
-
40
-
41
-
42
-
43
-
44
-
45
-
46
-
47
-
48
-
49
-
50
-
51
-
52
-
53
-
54
-
55
-
56
-
57
-
58
-
59
-
60
-
61
-
62
-
63
-
64
-
65
-
66
-
67
-
68
-
69
-
70
-
71
-
72
-
73
-
74
-
75
-
76
-
77
-
78
-
79
-
80
-
81
-
82
-
83
-
84
-
85
-
86
-
 87
87 -
 88
88 -
 89
89 -
 90
90 -
 91
91 -
 92
92 -
 93
93 -
 94
94 -
 95
95 -
 96
96 -
 97
97 -
98
-
99
-
100
-
101
-
102
-
103
-
104
-
105
-
106
-
107
-
108
-
109
-
110
-
111
-
112
-
113
-
114
-
115
-
116
-
117
-
118
-
119
 |
 |