Brother International Entrepreneur PR-650 Users Manual - English - Page 155
the operation panel. Make sure that
 |
View all Brother International Entrepreneur PR-650 manuals
Add to My Manuals
Save this manual to your list of manuals |
Page 155 highlights
If the touch pen is stored in the touch pen 1 holder, remove it. Insert the arm on the card reader holder into 3 the corresponding opening on the back of the operation panel. Make sure that the handle on the card reader holder fits into the touch pen holder. 1 Touch pen With the indicator side facing up, place the 2 embroidery card reader in the card reader holder. Be sure to feed the card reader cable through the card reader holder, as shown below. 1 Arm 1 Card reader holder 2 Embroidery card reader 3 Indicator 4 Card reader cable 5 1 Handle on card reader holder 2 Touch pen holder on operation panel Push down on the card reader holder until it 4 snaps into place to attach it to the operation panel. Selecting an Embroidery Pattern 153
-
 1
1 -
2
-
3
-
4
-
5
-
6
-
7
-
8
-
9
-
10
-
11
-
12
-
13
-
14
-
15
-
16
-
17
-
18
-
19
-
20
-
21
-
22
-
23
-
24
-
25
-
26
-
27
-
28
-
29
-
30
-
31
-
32
-
33
-
34
-
35
-
36
-
37
-
38
-
39
-
40
-
41
-
42
-
43
-
44
-
45
-
46
-
47
-
48
-
49
-
50
-
51
-
52
-
53
-
54
-
55
-
56
-
57
-
58
-
59
-
60
-
61
-
62
-
63
-
64
-
65
-
66
-
67
-
68
-
69
-
70
-
71
-
72
-
73
-
74
-
75
-
76
-
77
-
78
-
79
-
80
-
81
-
82
-
83
-
84
-
85
-
86
-
87
-
88
-
89
-
90
-
91
-
92
-
93
-
94
-
95
-
96
-
97
-
98
-
99
-
100
-
101
-
102
-
103
-
104
-
105
-
106
-
107
-
108
-
109
-
110
-
111
-
112
-
113
-
114
-
115
-
116
-
117
-
118
-
119
-
120
-
121
-
122
-
123
-
124
-
125
-
126
-
127
-
128
-
129
-
130
-
131
-
132
-
133
-
134
-
135
-
136
-
137
-
138
-
139
-
140
-
141
-
142
-
143
-
144
-
145
-
146
-
147
-
148
-
149
-
 150
150 -
 151
151 -
 152
152 -
 153
153 -
 154
154 -
 155
155 -
 156
156 -
 157
157 -
 158
158 -
 159
159 -
 160
160 -
161
-
162
-
163
-
164
-
165
-
166
-
167
-
168
-
169
-
170
-
171
-
172
-
173
-
174
-
175
-
176
-
177
-
178
-
179
-
180
-
181
-
182
-
183
-
184
-
185
-
186
-
187
-
188
-
189
-
190
-
191
-
192
-
193
-
194
-
195
-
196
-
197
-
198
-
199
-
200
-
201
-
202
-
203
-
204
-
205
-
206
-
207
-
208
-
209
-
210
-
211
-
212
-
213
-
214
-
215
-
216
-
217
-
218
-
219
-
220
-
221
-
222
-
223
-
224
-
225
-
226
-
227
-
228
-
229
-
230
-
231
-
232
-
233
-
234
-
235
-
236
-
237
-
238
-
239
-
240
-
241
-
242
-
243
-
244
-
245
-
246
-
247
-
248
-
249
-
250
-
251
-
252
-
253
-
254
-
255
-
256
-
257
-
258
-
259
-
260
-
261
-
262
-
263
-
264
-
265
-
266
-
267
-
268
-
269
-
270
-
271
-
272
-
273
-
274
-
275
-
276
-
277
-
278
-
279
-
280
 |
 |
Selecting an Embroidery Pattern
153
—————————————————————————————————————————————————————————————————————————————————————
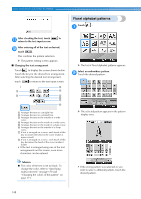
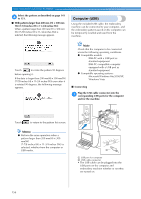
5
1
If the touch pen is stored in the touch pen
holder, remove it.
1
Touch pen
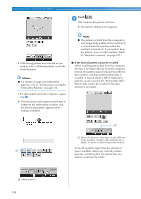
2
With the indicator side facing up, place the
embroidery card reader in the card reader
holder.
Be sure to feed the card reader cable through
the card reader holder, as shown below.
1
Card reader holder
2
Embroidery card reader
3
Indicator
4
Card reader cable
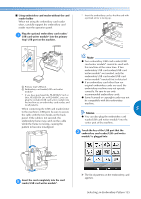
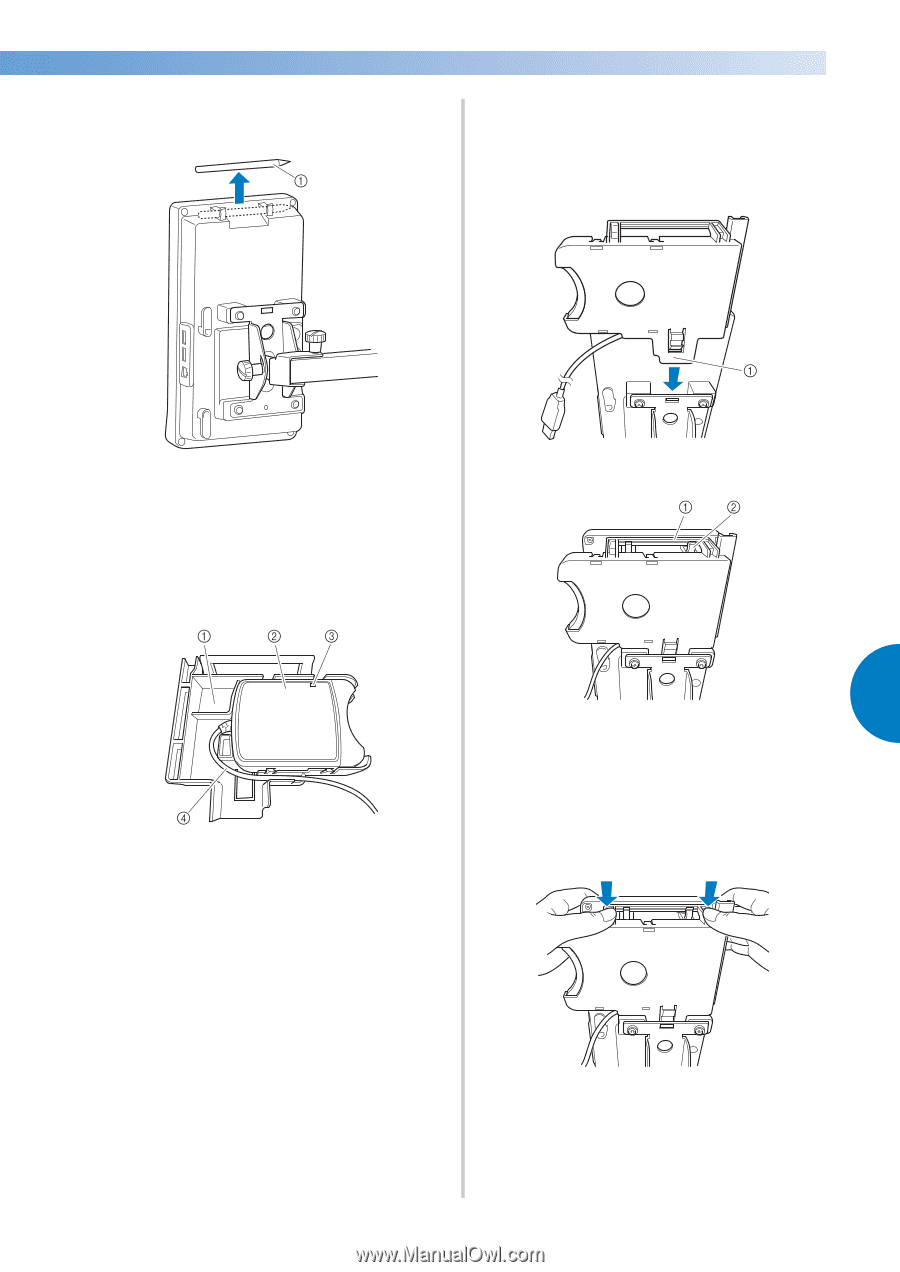
3
Insert the arm on the card reader holder into
the corresponding opening on the back of
the operation panel. Make sure that the
handle on the card reader holder fits into the
touch pen holder.
1
Arm
1
Handle on card reader holder
2
Touch pen holder on operation panel
4
Push down on the card reader holder until it
snaps into place to attach it to the operation
panel.