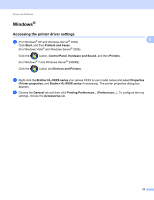
Brother International HL-6180DW User's Guide - English - Page 34
Resolution, Print Settings, Multiple Plain Paper, Thick Paper, Bond Paper, Envelopes, Env. Thick
 |
View all Brother International HL-6180DW manuals
Add to My Manuals
Save this manual to your list of manuals |
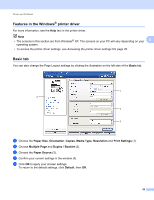
Page 34 highlights
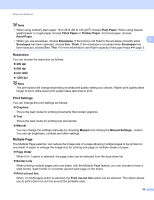
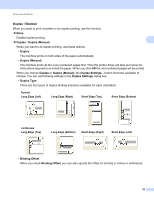
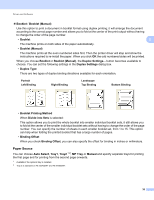
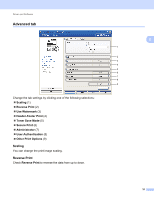
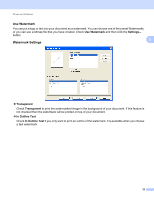
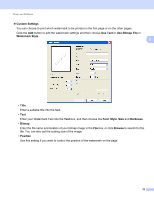
Driver and Software Note • When using ordinary plain paper 16 to 28 lb (60 to 105 g/m2) choose Plain Paper. When using heavier weight paper or rough paper choose Thick Paper or Thicker Paper. For bond paper, choose Bond Paper. • When you use envelopes, choose Envelopes. If the toner is not fixed to the envelope correctly when 2 Envelopes has been selected, choose Env. Thick. If the envelope is crumpled when Envelopes has been selected, choose Env. Thin. For more information, see Paper capacity of the paper trays uu page 3. Resolution 2 You can choose the resolution as follows. 300 dpi 600 dpi HQ 1200 1200 dpi Note The print speed will change depending on what print quality setting you choose. Higher print quality takes longer to print, while lower print quality takes less time to print. Print Settings 2 You can change the print settings as follows: Graphics This is the best mode for printing documents that contain graphics. Text This is the best mode for printing text documents. Manual You can change the settings manually by choosing Manual and clicking the Manual Settings... button. You can set brightness, contrast and other settings. Multiple Page 2 The Multiple Page selection can reduce the image size of a page allowing multiple pages to be printed on one sheet of paper or enlarge the image size for printing one page on multiple sheets of paper. Page Order When N in 1 option is selected, the page order can be selected from the drop-down list. Border Line When printing multiple pages onto one sheet, with the Multiple Page feature, you can choose to have a solid border, dash border or no border around each page on the sheet. Print cut-out line When 1 in NxN pages option is selected, the Print cut-out line option can be selected. This option allows you to print a faint cut-out line around the printable area. 28
-
 1
1 -
2
-
3
-
4
-
5
-
6
-
7
-
8
-
9
-
10
-
11
-
12
-
13
-
14
-
15
-
16
-
17
-
18
-
19
-
20
-
21
-
22
-
23
-
24
-
25
-
26
-
27
-
28
-
 29
29 -
 30
30 -
 31
31 -
 32
32 -
 33
33 -
 34
34 -
 35
35 -
 36
36 -
 37
37 -
 38
38 -
 39
39 -
40
-
41
-
42
-
43
-
44
-
45
-
46
-
47
-
48
-
49
-
50
-
51
-
52
-
53
-
54
-
55
-
56
-
57
-
58
-
59
-
60
-
61
-
62
-
63
-
64
-
65
-
66
-
67
-
68
-
69
-
70
-
71
-
72
-
73
-
74
-
75
-
76
-
77
-
78
-
79
-
80
-
81
-
82
-
83
-
84
-
85
-
86
-
87
-
88
-
89
-
90
-
91
-
92
-
93
-
94
-
95
-
96
-
97
-
98
-
99
-
100
-
101
-
102
-
103
-
104
-
105
-
106
-
107
-
108
-
109
-
110
-
111
-
112
-
113
-
114
-
115
-
116
-
117
-
118
-
119
-
120
-
121
-
122
-
123
-
124
-
125
-
126
-
127
-
128
-
129
-
130
-
131
-
132
-
133
-
134
-
135
-
136
-
137
-
138
-
139
-
140
-
141
-
142
-
143
-
144
-
145
-
146
-
147
-
148
-
149
-
150
-
151
-
152
-
153
-
154
-
155
-
156
-
157
-
158
-
159
-
160
-
161
-
162
-
163
-
164
-
165
-
166
-
167
-
168
-
169
-
170
-
171
-
172
-
173
-
174
-
175
-
176
-
177
 |
 |