Brother International LS2-B837 Instruction Manual - Page 12
stitching, operation, Oberlappungsnahen, Points, d'arret, Funcionamiento, rematado, hacia, atras
 |
View all Brother International LS2-B837 manuals
Add to My Manuals
Save this manual to your list of manuals |
Page 12 highlights
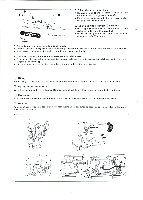
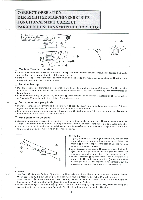
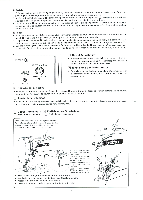
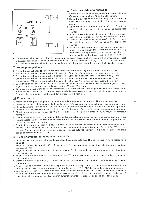
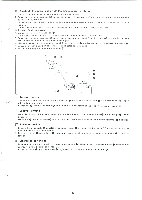
0 00 0 0 LI Back tack stitching operation A n/le BACK TACK START ON END ON OFF 0 OFF Eainn FEI 17)1 oL~jc 1. Set the back tack stitching switches (front overlap stitching 0, end overlap stitching 0) to the ON position. 2. Select the desired number of stitches (0 - 9) of the front back tack stitching advance "A" by using the appropriated counter. 3. Select the desired number of stitches (0 - 9) of the front back tack stitching reverse "B" by using the appropriate counter. 4. Select the desired number of stitches (0- 9)of the end back tack stitching reverse "C" by using the appropriate counter. 5. Select the desired number of stitches (0- 9) of the end back tack stitching advance "D" by using the appropriate counter. * When the upper portion of the foot pedal is depressed, the presser foot will lower; then, when the foot pedal is fully depressed to begin sewing, the sewing machine will automatically sew front back tack stitching "A" and "B". * The sewing machine will stop when the foot pedal is released at the completion of sewing; then, when the foot pedal is depressed once again, the machine will automatically sew end back tack stitching "C" and "D". The thread cutter and the thread clearer will function automatically, and then the presser foot will rise when the foot pedal is released. E Oberlappungsnahen 1. Stellen Sie die Schalter 0 fur das Vorwartsnahen und den Schalter fur das ZurUcknahen auf „ON". 2. Stellen Sie am Zahler die gewunschte Stichzahl (0 - 9) fur das Vorwartsnahen des Abschnitts „A" ein. 3. Stellen Sie am Zeiler die gewiinschte Stichzahl (0 -' 9) fur das Ruckwartsnahen des Abschnitts „B" ein. 4. Stellen Sie am .Zahler die gewiinschte Stichzahl (0 - 9) fur das Ruckwartsnahen des Abschnitts „C" ein. 5. Stellen Sie am Zahler die gewiinschte Stichzahl (0 - 9) fur das Vorwartsnahen des Abschnitts „D" ein. * Durch Drucken des oberen Teils des Pedals senkt sich der Stoffdruckerfull. Wenn das Pedal weiter gedruckt wird, beginnt die Maschine automatisch die Abschnitte „A" und „B" zu nahen. * Die Maschine stoppt, wenn das Pedal losgelassen wird. Wenn das Pedal erneut gedruckt wird, naht die Maschine automatisch die Abschnitte „C" und „D". Wenn das Pedal losgelassen wird, werden der Fadenabschneider und der Fadenwischer automatisch betatigt und der Stoffdruckerfug hebt sich. E Points d'arret 1. Mettre les interrupteurs de points d'arret en debut et de points d'arret en fin sur la position ON. 2. Choisir le nombre desire de points (0 a 9), de l'avance "A" des points d'arret en debut sur le compteur approprie. 3. Choisir le nombre desire de points (0 a 9)du retour "B" des points d'arret en debut au moyen du compteur approprie. 4. Choisir le nombre desire de points (0 a 9) du retour "C" des points d'arret en fin, au moyen du compteur approprie. 5. Choisir le nombre de points desires (0 a 9) de l'avance "D" des points d'arret en fin, au moyen du compteur approprie. * Lorsqu'on appuie sur la partie superieure de la pedale au pied, le pied presseur s'abaisse. Lorsqu'on appuie alors sur toute la pedale au pied, afin de commencer la couture, la machine a coudre coud automatiquement les points d'arret "A" et "B" en debut de couture. * A la fin de la couture, la machine a coudre s'arrete des qu'on relache la pedale au pied. Lorsqu'on appuie alors a nouveau sur la pedale au pied, la machine a coudre coud automatiquement les points d'arret "C" et "D" de fin de couture. Sitot les points d'arret termines, le coupe-fils coupe automatiquement les fils et le pied presseur s'eleve des qu'on relache la pedale au pied. Funcionamiento del rematado hacia atras 1. Encender los interruptores del inicio del rematado hacia atras delantero y de finalizacion del rematado hacia atras O. 2. Elegir el numero de puntadas (0 - 9) del avance "A" del rematado hacia atras delantero en el contador correspondiente. 3. Elegir el numero de puntadas (0 - 9) de inversion "B" del rematado hacia atras delantero en el contador correspondiente. 4. Elegir el numero de puntadas (0 - 9) de inversion "C" de finalizacion del rematado hacia atras en el medidor correspondiente. 5. Elegir el numero de puntadas (0 - 9) de avance "D" de finalizacion del rematado hacia atras en el contador correspondiente. * Al pisar la parte superior del pedal bajara el prensatelas; ycuando se pisa el pedal a fondo para comenzar la costura, la maquina de coser comenzara automaticamente las costuras "A" y "B" de rematado hacia atras delantero * La maquina de coser se detendra al soltar el pedal cuando se termina de coser. Al pisar nuevamente el pedal, la maquina comenzara a coser automaticamente las costuras "C" y "D" de finalizacion del rematado hacia atras. El cortahilos y el retirador de hilos funcionaran automaticamente y el prensatelas subira al soltar el pedal.
-
 1
1 -
2
-
3
-
4
-
5
-
6
-
 7
7 -
 8
8 -
 9
9 -
 10
10 -
 11
11 -
 12
12 -
 13
13 -
 14
14 -
 15
15 -
 16
16 -
 17
17 -
18
-
19
-
20
-
21
-
22
-
23
-
24
-
25
-
26
-
27
-
28
-
29
-
30
-
31
-
32
 |
 |
