Brother International MFC 8870DW Quick Setup Guide - English - Page 16
Windows® - usb printer
 |
UPC - 012502615101
View all Brother International MFC 8870DW manuals
Add to My Manuals
Save this manual to your list of manuals |
Page 16 highlights
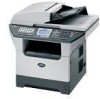
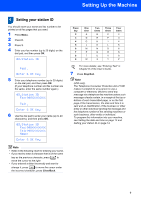
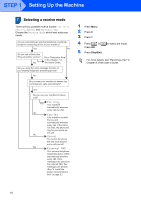
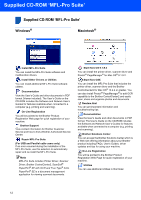
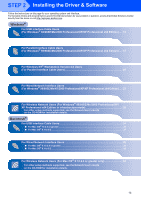
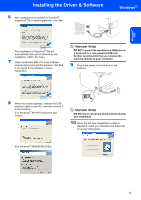
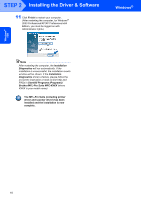
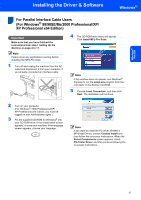
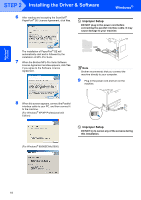
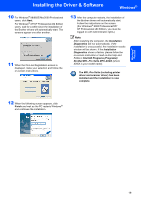
Windows® USB STEP 2 Installing the Driver & Software Windows® 1 For USB Interface Cable Users (For Windows® 98/98SE/Me/2000 Professional/XP/ XP Professional x64 Edition) Important Make sure that you have finished the instructions from step 1 Setting Up the Machine on page 4 to 11. 4 The CD-ROM main menu will appear. Click Install MFL-Pro Suite. Note Please close any applications running before installing the MFL-Pro Suite. 1 Turn off and unplug the machine from the AC outlet and disconnect it from your computer, if you already connected an interface cable. Note If this window does not appear, use Windows® Explorer to run the setup.exe program from the root folder of the Brother CD-ROM. 5 Choose Local Connection, and then click Next. The installation will continue. 2 Turn on your computer. (For Windows® 2000 Professional/XP/ XP Professional x64 Edition, you must be logged on with Administrator rights.) 3 Put the supplied CD-ROM for Windows® into your CD-ROM drive. If the model name screen appears, choose your machine. If the language screen appears, choose your language. Note If you want to install the PS driver (Brother's BR-Script Driver), choose Custom Install and then follow the on-screen instructions. When the Select Components screen appears, check PS Printer Driver, and then continue following the on-screen instructions 14
-
 1
1 -
2
-
3
-
4
-
5
-
6
-
7
-
8
-
9
-
10
-
 11
11 -
 12
12 -
 13
13 -
 14
14 -
 15
15 -
 16
16 -
 17
17 -
 18
18 -
 19
19 -
 20
20 -
 21
21 -
22
-
23
-
24
-
25
-
26
-
27
-
28
-
29
-
30
-
31
-
32
-
33
-
34
-
35
-
36
-
37
-
38
-
39
-
40
-
41
-
42
-
43
-
44
-
45
-
46
-
47
-
48
-
49
-
50
-
51
-
52
-
53
-
54
-
55
-
56
-
57
-
58
-
59
-
60
 |
 |