Brother International PJ623 PocketJet 6 Plus Print Engine User Guide - Page 26
Setting Paper Size
 |
View all Brother International PJ623 PocketJet 6 Plus Print Engine manuals
Add to My Manuals
Save this manual to your list of manuals |
Page 26 highlights
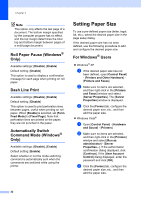
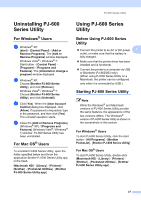
Chapter 2 Note This option only affects the last page of a document. The bottom margin specified by the computer program has no effect, and the top margin determines the total top and bottom margin between pages of a multi-page document. Roll Paper Pause (Windows® Only) 2 Available settings: [Disable], [Enable] Default setting: [Disable] This option is used to display a confirmation message for each page when printing on roll paper. Dash Line Print 2 Available settings: [Disable], [Enable] Default setting: [Disable] This option is used to print perforation lines between pages, useful when printing on roll paper. When [Enable] is selected, set [Form Feed Mode] to [Fixed Page]. Note that perforation lines are printed on the paper; they are not punched in the paper. Automatically Switch Command Mode (Windows® Only) 2 Available settings: [Disable], [Enable] Default setting: [Enable] Select whether or not the mode switching command is automatically sent when the commands are switched while using the printer. Setting Paper Size 2 To use a pre-defined paper size (letter, legal, A4, etc.), select the desired paper size in the page setup dialog. If the desired paper size has not been defined, use the following procedure to add and configure the desired paper size. For Windows® Users 2 Windows® XP a If the desired paper size has not been defined, open [Control Panel] - [Printers and Other Hardware] [Printers and Faxes]. b Make sure no items are selected, and then right-click in the [Printers and Faxes] window and select [Server Properties]. The [Server Properties] window is displayed. c Click the [Forms] tab, configure the desired paper size, etc., and then add the paper size. Windows Vista® a Open [Control Panel] - [Hardware and Sound] - [Printers]. b Make sure no items are selected, and then right-click in the [Printers] window and select [Run as administrator] - [Server Properties...]. If the authorization confirmation dialog displayed, click [Continue]. If the [User Account Control] dialog displayed, enter the password and click [OK]. c Click the [Forms] tab, configure the desired paper size, etc., and then add the paper size. 22
-
 1
1 -
2
-
3
-
4
-
5
-
6
-
7
-
8
-
9
-
10
-
11
-
12
-
13
-
14
-
15
-
16
-
17
-
18
-
19
-
20
-
 21
21 -
 22
22 -
 23
23 -
 24
24 -
 25
25 -
 26
26 -
 27
27 -
 28
28 -
 29
29 -
 30
30 -
 31
31 -
32
-
33
-
34
-
35
-
36
-
37
-
38
-
39
-
40
-
41
-
42
-
43
-
44
-
45
-
46
-
47
-
48
-
49
-
50
-
51
-
52
-
53
-
54
-
55
-
56
-
57
-
58
-
59
-
60
-
61
 |
 |
