Canon CONSOLE Image Control & Storage Software v1.1 CONSOLE_V1-1_ENG.pdf - Page 15
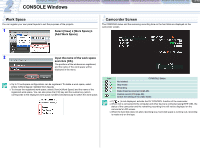
Work Space, Camcorder Screen, Select [View], Add Work Space]., Input the name of the work space
 |
View all Canon CONSOLE Image Control & Storage Software v1.1 manuals
Add to My Manuals
Save this manual to your list of manuals |
Page 15 highlights
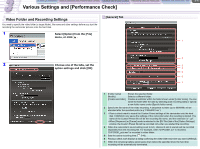
CONSOLE Windows Various Settings and [Performance Check] Camera and Picture Control Recording onto the Hard Disk Playback the Recorded Files CONSOLE Windows 2-15 Work Space You can register your own panel layouts to suit the purposes of the projects. 1 Select [View] [Work Space] [Add Work Space]. Camcorder Screen The CONSOLE status and the remaining recording time on the hard disk are displayed on the camcorder screen. 2 Input the name of the work space and click [OK]. The positions of the windows are registered, and the name of the work space will be displayed in the menu. Up to 10 workspace configurations can be registered. To delete a work space, select [View] [Work Space] [Delete Work Space]. To choose the registered work space, select [View] [Work Space] and the name of the registered work space. You can also press the [Ctrl] key and the number key (which corresponds to the displayed work space number) simultaneously to switch the work space. Icon CONSOLE Status Not started Stop mode Recording Data dropping occurred ( 5-48). Cannot record ( Appx-59). Check the setting of the video folder. If [ ] is not displayed, activate the DV CONTROL function of the camcorder. When XL2 is connected to the computer and other device is connected using IEEE1394, the status of the camcorder and the remaining recording time will not be displayed on the camcorder's LCD screen. When the hard disk does not allow recording (e.g. hard disk space is running out), recording is made only on the tape.
-
 1
1 -
2
-
3
-
4
-
5
-
6
-
7
-
8
-
9
-
 10
10 -
 11
11 -
 12
12 -
 13
13 -
 14
14 -
 15
15 -
 16
16 -
 17
17 -
 18
18 -
 19
19 -
 20
20 -
21
-
22
-
23
-
24
-
25
-
26
-
27
-
28
-
29
-
30
-
31
-
32
-
33
-
34
-
35
-
36
-
37
-
38
-
39
-
40
-
41
-
42
-
43
-
44
-
45
-
46
-
47
-
48
-
49
-
50
-
51
-
52
-
53
-
54
-
55
-
56
-
57
-
58
-
59
-
60
-
61
-
62
 |
 |
