Canon CONSOLE Image Control & Storage Software v1.1 CONSOLE_V1-1_ENG.pdf - Page 20
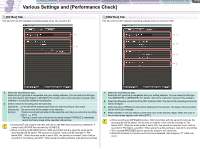
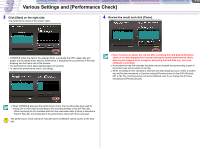
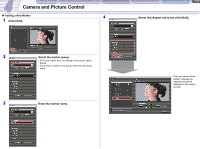
Click [Start] on the right side., Review the result and click [Close
 |
View all Canon CONSOLE Image Control & Storage Software v1.1 manuals
Add to My Manuals
Save this manual to your list of manuals |
Page 20 highlights
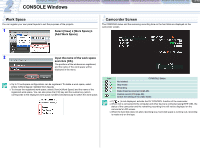
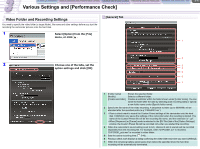
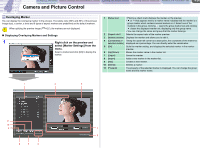
CONSOLE Windows Various Settings and [Performance Check] Camera and Picture Control Recording onto the Hard Disk Playback the Recorded Files 3-20 Various Settings and [Performance Check] 3 Click [Start] on the right side. The performance check of the system starts. 4 Review the result and click [Close]. • CONSOLE writes the data to the selected folder to evaluate the CPU usage ratio and graphs out the results every second; furthermore, it evaluates the occurrences of the data dropping and the frame rate of the preview. • The performance check takes approximately 30 seconds. • To cancel the performance check, click [Stop]. Even if all bars are above the red line after executing the hard disk performance check or no data dropping has occurred during the system performance check, data may be dropped when a program accessing the hard disk (e.g. anti-virus software) is activated. A bar below the red line indicates that data may be dropped during recording (a part of the picture may not be written to the file). When recording in HDV standard is selected and data dropping occurs, select a smaller size at [Preview resolution] or [I picture only] at [Preview picture] in the [HDV Rec] tab. ( 3-18) The recording picture will not be affected even if you change the [Preview resolution] or [Preview picture]. When CONSOLE executes the performance check, the recording data type used for writing (DV or HDV) will be according to the recording settings in the [DV Rec] tab. - When receiving the DV standard data from the camcorder while [Frame] is selected in the [DV Rec] tab, the writing test of the performance check will not be executed. The performance check cannot be executed when CONSOLE cannot access to the hard disk.
-
 1
1 -
2
-
3
-
4
-
5
-
6
-
7
-
8
-
9
-
10
-
11
-
12
-
13
-
14
-
 15
15 -
 16
16 -
 17
17 -
 18
18 -
 19
19 -
 20
20 -
 21
21 -
 22
22 -
 23
23 -
 24
24 -
 25
25 -
26
-
27
-
28
-
29
-
30
-
31
-
32
-
33
-
34
-
35
-
36
-
37
-
38
-
39
-
40
-
41
-
42
-
43
-
44
-
45
-
46
-
47
-
48
-
49
-
50
-
51
-
52
-
53
-
54
-
55
-
56
-
57
-
58
-
59
-
60
-
61
-
62
 |
 |
