Canon CONSOLE Image Control & Storage Software v1.1 CONSOLE_V1-1_ENG.pdf - Page 37
[Custom Preset], Adjusting the Custom Preset Settings
 |
View all Canon CONSOLE Image Control & Storage Software v1.1 manuals
Add to My Manuals
Save this manual to your list of manuals |
Page 37 highlights
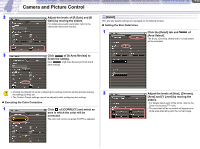
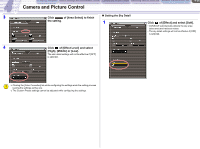
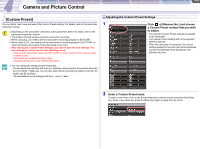
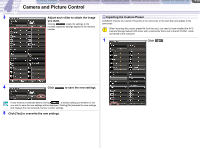
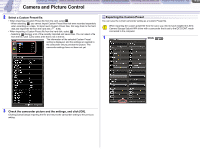
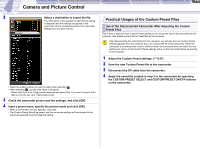
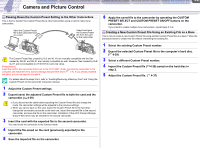
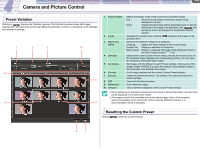
CONSOLE Windows Various Settings and [Performance Check] Camera and Picture Control Recording onto the Hard Disk Playback the Recorded Files Camera and Picture Control 4-37 [Custom Preset] You can adjust, load, save and export the Custom Preset settings. For details, refer to the camcorder instruction manual. Depending on the camcorder connected, some parameters differ. For details, refer to the camcorder instruction manual. The [Custom Preset] window cannot be used when recording. When using XL2, you need to set the camcorder's recording program to EXT.CONT. When using XL H1, you need to set the camcorder's recording program to EXT.CONT. to import and export the Custom Preset file saved on the card. After altering the Custom Preset settings, you need to save the new settings. The new settings will not be saved in the following cases. - Changing the camcorder mode from EXT. CONT. to other modes or from Camera mode to other modes - Disconnecting the IEEE1394 (DV) cable - Changing the position of the TAPE/CARD switch You can change the setting using the keyboard. - You can select the next item with the [ ] or [Tab] key, and go back to the previous item with the [ ] or [Shift] + [Tab] keys. You can also select items by pressing [2] (down), [4] (left), [6] (right), and [8] (up) keys. - The parameters can be changed with the [] and [ ] keys. Adjusting the Custom Preset Settings 1 Click of [Memory No.] and choose a Custom Preset number that you wish to adjust. • The selected Custom Preset settings are applied to the camcorder. • The Custom Preset settings will not be applied if [OFF] is selected. • When the camcorder is connected, the current settings applied to the camcorder will be displayed and [Current Setting] will be displayed in the [Memory No.] box. 2 Enter a Custom Preset name. To enter a new name, click on the [Preset Name] box with the mouse and press the [Enter] key. Enter a new name and press the [Enter] key again to apply the new name.
-
 1
1 -
2
-
3
-
4
-
5
-
6
-
7
-
8
-
9
-
10
-
11
-
12
-
13
-
14
-
15
-
16
-
17
-
18
-
19
-
20
-
21
-
22
-
23
-
24
-
25
-
26
-
27
-
28
-
29
-
30
-
31
-
 32
32 -
 33
33 -
 34
34 -
 35
35 -
 36
36 -
 37
37 -
 38
38 -
 39
39 -
 40
40 -
 41
41 -
 42
42 -
43
-
44
-
45
-
46
-
47
-
48
-
49
-
50
-
51
-
52
-
53
-
54
-
55
-
56
-
57
-
58
-
59
-
60
-
61
-
62
 |
 |
