Canon CONSOLE Image Control & Storage Software v1.1 CONSOLE_V1-1_ENG.pdf - Page 34
[Color Control], [Color Correction]
 |
View all Canon CONSOLE Image Control & Storage Software v1.1 manuals
Add to My Manuals
Save this manual to your list of manuals |
Page 34 highlights
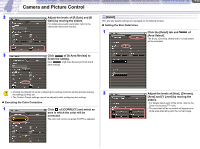
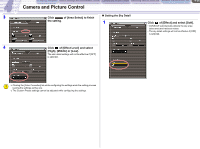
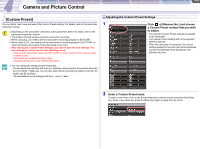
CONSOLE Windows Various Settings and [Performance Check] Camera and Picture Control Recording onto the Hard Disk Playback the Recorded Files Camera and Picture Control 4-34 [Color Control] The settings for [Color Correction] and skin and sky details are managed on the [Color Control] window. You can switch over each panel by clicking the tabs. When connecting the XL H1 or XL2, this function will not be activated. [Color Correction] „ Determining and Adjusting the Color To Be Corrected The color correction will be set by adjusting the hue, chroma, area and Y level, the corrections will only be applied to the set color. • [Color Phase]: Select the basic color phase (0-15) of the color to be detected. Use the following values as an approximate reference: 0=purple, 3=red, 6=orange, 9=green, 12=blue. • [Chroma]: Adjust the color saturation for the color to be detected. The more you adjust to [+], the area detected will extend to include more vivid and richer colors. • [Area]: Adjust the color range for the color to be detected. Adjusting to [+] detects a wider color range, and to [-] a narrower color range. • [Y Level]: Adjust the brightness for the color to be detected. Adjusting to [+] detects brighter colors, and to [-] detects darker colors. 1 Click the [Color Correction] tab and of [A Area Select]. • The [Color Phase], [Chroma], [Area] and [Y Level] sliders will be activated. • To set the B area, click Select]. of [B Area 2 Adjust the levels of [Color Phase], [Chroma], [Area] and [Y Level] by moving the sliders. • For details about each parameter, refer to the camcorder instruction manual. • The area that will be corrected will appear as a white area alternating with the normal image. 3 Click of [A Area Select] to finish the setting. Click of [B Area Select] to finish the B area settings. Clicking the [Detail] tab while configuring the settings ends the setting process leaving the settings as they are. The Custom Preset settings cannot be adjusted while configuring the settings. „ Adjusting the Color Correction • [R Gain]: Adjust the red gain of the detected area. Adjusting to [+] results in stronger red tones, and to [-] in stronger cyan tones. • [B Gain]: Adjust the blue gain of the detected area. Adjusting to [+] results in stronger blue tones, and to [-] in stronger yellow tones. 1 Click of [A Area Review]. • [R Gain] and [B Gain] sliders will be activated. • To adjust the B area color, click of [B Area Review].
-
 1
1 -
2
-
3
-
4
-
5
-
6
-
7
-
8
-
9
-
10
-
11
-
12
-
13
-
14
-
15
-
16
-
17
-
18
-
19
-
20
-
21
-
22
-
23
-
24
-
25
-
26
-
27
-
28
-
 29
29 -
 30
30 -
 31
31 -
 32
32 -
 33
33 -
 34
34 -
 35
35 -
 36
36 -
 37
37 -
 38
38 -
 39
39 -
40
-
41
-
42
-
43
-
44
-
45
-
46
-
47
-
48
-
49
-
50
-
51
-
52
-
53
-
54
-
55
-
56
-
57
-
58
-
59
-
60
-
61
-
62
 |
 |
