Canon MP370 MultiPASS MP370/360 User's Guide - Page 104
Cause, Action, Panel]. Windows XP: Click [Start] on the taskbar, then [Control - printer troubleshooting
 |
UPC - 013803037111
View all Canon MP370 manuals
Add to My Manuals
Save this manual to your list of manuals |
Page 104 highlights
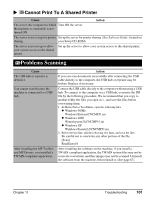
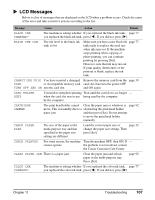
Cause Action The machine is not recognized in the [Scanners and Cameras] window of [Control Panel]. Follow this procedure to check whether the machine icon is present in [Scanners and Cameras] of [Control Panel]: 1. Confirm that the USB cable is connected, and start the computer. 2. Click [Start] on the taskbar, point to [Settings], then click [Control Panel]. (Windows XP: Click [Start] on the taskbar, then [Control Panel].) 3. Double-click [Scanners and Cameras]. (Windows XP: In the [Control Panel] window, click [Printers and Other Hardware], then [Scanners and Cameras].) 4. In the [Scanners and Cameras] window, if [Canon MP370] or [Canon MP360] (Windows XP: [WIA Canon MP370] or [WIA Canon MP360]) is present, the machine is recognized. If not, uninstall the software and reinstall it. (See page 67) Memory is insufficient. Close other open applications and try again. The hard disk does not have enough available memory. Check that the hard disk has enough available memory, in particular when scanning large documents at a high resolution. For example, a letter-size document scanned at 600 dpi, color requires a minimum of 300 MB of memory. If you do not have enough available memory, scan the document at a lower resolution. The resolution is low. If the image looks grainy, increase the scan resolution. (See Software Guide, located on your Setup CD-ROM) The image is not displayed at 100% magnification in the application. Display the image at 100% magnification. Some applications do not display a small image very well. There is moire when you scan printed material. In ScanGear MP, click [Descreen]. (See Software Guide, located on your Setup CD-ROM) The monitor display colors are set In [Display Properties], set the display colors to 16-bit color, 24-bit too low. color or higher. The scanning area is not specified. In ScanGear MP, click [Multi-Scan] to automatically specify the scan area. If there are white margins around documents such as photographs, or if you want to trim a document (i.e. you want to scan only one part of a document), specify the area of the scan manually. (See Software Guide, located on your Setup CD-ROM) The scanned area does not cover Place the document approximately 1/8 in. (3 mm) away from the the entire document. front and right edges of the platen glass. The color tone displayed in the Perform calibration to scan the image with the correct color tone. preview screen differs from that of (See Software Guide, located on your Setup CD-ROM) the original. A cause other than the above is Restart the computer. suspected. 102 Troubleshooting Chapter 11
-
 1
1 -
2
-
3
-
4
-
5
-
6
-
7
-
8
-
9
-
10
-
11
-
12
-
13
-
14
-
15
-
16
-
17
-
18
-
19
-
20
-
21
-
22
-
23
-
24
-
25
-
26
-
27
-
28
-
29
-
30
-
31
-
32
-
33
-
34
-
35
-
36
-
37
-
38
-
39
-
40
-
41
-
42
-
43
-
44
-
45
-
46
-
47
-
48
-
49
-
50
-
51
-
52
-
53
-
54
-
55
-
56
-
57
-
58
-
59
-
60
-
61
-
62
-
63
-
64
-
65
-
66
-
67
-
68
-
69
-
70
-
71
-
72
-
73
-
74
-
75
-
76
-
77
-
78
-
79
-
80
-
81
-
82
-
83
-
84
-
85
-
86
-
87
-
88
-
89
-
90
-
91
-
92
-
93
-
94
-
95
-
96
-
97
-
98
-
 99
99 -
 100
100 -
 101
101 -
 102
102 -
 103
103 -
 104
104 -
 105
105 -
 106
106 -
 107
107 -
 108
108 -
 109
109 -
110
-
111
-
112
-
113
-
114
-
115
-
116
-
117
-
118
-
119
-
120
-
121
-
122
-
123
-
124
-
125
-
126
-
127
-
128
-
129
-
130
-
131
-
132
-
133
-
134
-
135
-
136
-
137
-
138
-
139
-
140
 |
 |
