Canon MP370 MultiPASS MP370/360 User's Guide - Page 114
Settings, Function key: [COPY], Menu: ENLARGE/REDUCE, Menu: PAPER SELECT, Menu: DENSITY
 |
UPC - 013803037111
View all Canon MP370 manuals
Add to My Manuals
Save this manual to your list of manuals |
Page 114 highlights
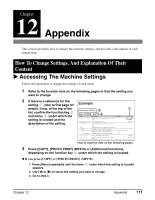
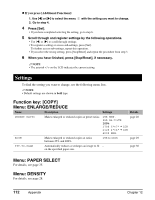
z If you press [Additional Functions]: 1. Use [W] or [X] to select the menu 2. Go to step 4. with the setting you want to change. 4 Press [Set]. • If you have completed selecting the setting, go to step 6. 5 Scroll through and register settings by the following operations. • Use [W] or [X] to scroll through settings. • To register a setting or access sub-settings, press [Set]. To further access sub-settings, repeat this operation. • If you select the wrong setting, press [Stop/Reset] and repeat the procedure from step 3. 6 When you have finished, press [Stop/Reset], if necessary. NOTE • The asterisk on the LCD indicates the current setting. Settings To find the setting you want to change, see the following menu lists. NOTE • Default settings are shown in bold type. Function key: [COPY] Menu: ENLARGE/REDUCE Name Description Settings Details PRESET RATIO Makes enlarged or reduced copies at preset ratios. 25% MIN. 95% A4 J LTR 100% 170% 5"×7" J LTR 212% 4"×6" J LTR 400% MAX. page 28 ZOOM Makes enlarged or reduced copies at ratios between 25% and 400%. 25% to 400% page 29 FIT-TO-PAGE Automatically reduces or enlarges an image to fit on the specified paper size. page 30 Menu: PAPER SELECT For details, see page 25. Menu: DENSITY For details, see page 28. 112 Appendix Chapter 12
-
 1
1 -
2
-
3
-
4
-
5
-
6
-
7
-
8
-
9
-
10
-
11
-
12
-
13
-
14
-
15
-
16
-
17
-
18
-
19
-
20
-
21
-
22
-
23
-
24
-
25
-
26
-
27
-
28
-
29
-
30
-
31
-
32
-
33
-
34
-
35
-
36
-
37
-
38
-
39
-
40
-
41
-
42
-
43
-
44
-
45
-
46
-
47
-
48
-
49
-
50
-
51
-
52
-
53
-
54
-
55
-
56
-
57
-
58
-
59
-
60
-
61
-
62
-
63
-
64
-
65
-
66
-
67
-
68
-
69
-
70
-
71
-
72
-
73
-
74
-
75
-
76
-
77
-
78
-
79
-
80
-
81
-
82
-
83
-
84
-
85
-
86
-
87
-
88
-
89
-
90
-
91
-
92
-
93
-
94
-
95
-
96
-
97
-
98
-
99
-
100
-
101
-
102
-
103
-
104
-
105
-
106
-
107
-
108
-
 109
109 -
 110
110 -
 111
111 -
 112
112 -
 113
113 -
 114
114 -
 115
115 -
 116
116 -
 117
117 -
 118
118 -
 119
119 -
120
-
121
-
122
-
123
-
124
-
125
-
126
-
127
-
128
-
129
-
130
-
131
-
132
-
133
-
134
-
135
-
136
-
137
-
138
-
139
-
140
 |
 |