Canon REALiS LCOS WUX5800 WUX7500 WUX6700 WUX5800 Users Manual - Page 103
Relationship between Aspect and Screen Aspect, Adjusting Keystone Distortion
 |
View all Canon REALiS LCOS WUX5800 manuals
Add to My Manuals
Save this manual to your list of manuals |
Page 103 highlights
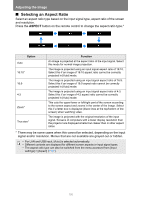
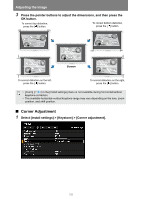
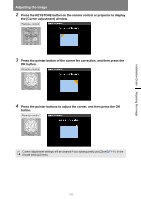
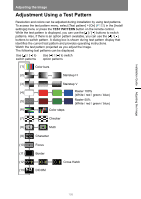
Installation Guide Adjusting the Image Adjusting the Image ■ Relationship between Aspect and Screen Aspect • If a computer image with an aspect ratio of 16:9 is not projected correctly when the setting is [Auto], select [16:9] as the screen aspect. • For a 16:9 image with black borders at the top and bottom, such as a terrestrial broadcast movie, you can project the 16:9 image area so that it is projected on the entire screen by selecting [Zoom] in [Aspect]. There may be some cases that [Zoom] cannot be selected depending on the input signal and/or resolution. • For keystone correction, select an option other than [4:3 D. image shift] or [16:9 D. image shift] for Screen aspect. Adjusting Keystone Distortion Two types of correction are available: horizontal/vertical correction and corner correction. Use horizontal/vertical keystone correction to adjust image width or height distortion separately, and use corner correction to adjust the position of each corner of the image. Keystone correction is also possible by pressing the KEYSTONE button on the remote control or projector. ■ Horizontal/Vertical Keystone Correction 1 Select [Install settings] > [Keystone] > [Horizontal-vertical keystone]. 2 Press the KEYSTONE button on the remote control or projector to display the [Horizontal-vertical keystone adjustment] window. Remote control 101
-
 1
1 -
2
-
3
-
4
-
5
-
6
-
7
-
8
-
9
-
10
-
11
-
12
-
13
-
14
-
15
-
16
-
17
-
18
-
19
-
20
-
21
-
22
-
23
-
24
-
25
-
26
-
27
-
28
-
29
-
30
-
31
-
32
-
33
-
34
-
35
-
36
-
37
-
38
-
39
-
40
-
41
-
42
-
43
-
44
-
45
-
46
-
47
-
48
-
49
-
50
-
51
-
52
-
53
-
54
-
55
-
56
-
57
-
58
-
59
-
60
-
61
-
62
-
63
-
64
-
65
-
66
-
67
-
68
-
69
-
70
-
71
-
72
-
73
-
74
-
75
-
76
-
77
-
78
-
79
-
80
-
81
-
82
-
83
-
84
-
85
-
86
-
87
-
88
-
89
-
90
-
91
-
92
-
93
-
94
-
95
-
96
-
97
-
 98
98 -
 99
99 -
 100
100 -
 101
101 -
 102
102 -
 103
103 -
 104
104 -
 105
105 -
 106
106 -
 107
107 -
 108
108 -
109
-
110
-
111
-
112
-
113
-
114
-
115
-
116
-
117
-
118
-
119
-
120
-
121
-
122
-
123
-
124
-
125
-
126
-
127
-
128
-
129
-
130
-
131
-
132
-
133
-
134
-
135
-
136
-
137
-
138
-
139
-
140
-
141
-
142
-
143
-
144
-
145
-
146
-
147
-
148
-
149
-
150
-
151
-
152
-
153
-
154
-
155
-
156
-
157
-
158
-
159
-
160
-
161
-
162
-
163
-
164
-
165
-
166
-
167
-
168
-
169
-
170
-
171
-
172
-
173
-
174
-
175
-
176
-
177
-
178
-
179
-
180
-
181
-
182
-
183
-
184
-
185
-
186
-
187
-
188
-
189
-
190
-
191
-
192
-
193
-
194
-
195
-
196
-
197
-
198
-
199
-
200
-
201
-
202
-
203
-
204
-
205
-
206
-
207
-
208
-
209
-
210
-
211
-
212
-
213
-
214
-
215
-
216
-
217
-
218
-
219
-
220
-
221
-
222
-
223
-
224
-
225
-
226
-
227
-
228
-
229
-
230
-
231
-
232
-
233
-
234
-
235
-
236
-
237
 |
 |
