Canon REALiS LCOS WUX5800 WUX7500 WUX6700 WUX5800 Users Manual - Page 107
Adjustment Using a Test Pattern
 |
View all Canon REALiS LCOS WUX5800 manuals
Add to My Manuals
Save this manual to your list of manuals |
Page 107 highlights
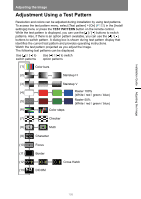
Installation Guide Adjusting the Image Adjusting the Image Adjustment Using a Test Pattern Resolution and colors can be adjusted during installation by using test patterns. To access the test pattern menu, select [Test pattern] > [On] (P152) in the [Install settings] menu or press the TEST PATTERN button on the remote control. While the test pattern is displayed, you can use the [ ] / [ ] buttons to switch patterns. Also, if there is an option pattern available, you can use the [ ] / [ ] buttons to switch pattern. A dialog box is shown during test pattern display that identifies the current test pattern and provides operating instructions. Watch the test pattern projected as you adjust the image. The following test patterns can be displayed. Use [ ] / [ ] to switch patterns Use [ ] / [ ] to switch option patterns (1) Color bars (2) Stairstep H (3) Stairstep V (4) Raster 100% (White / red / green / blue) (5) Raster 50% (White / red / green / blue) (6) Color steps (7) Checker (8) Multi (9) Character (10) Focus (11) Border (12) (13) DICOM Cross Hatch 105
-
 1
1 -
2
-
3
-
4
-
5
-
6
-
7
-
8
-
9
-
10
-
11
-
12
-
13
-
14
-
15
-
16
-
17
-
18
-
19
-
20
-
21
-
22
-
23
-
24
-
25
-
26
-
27
-
28
-
29
-
30
-
31
-
32
-
33
-
34
-
35
-
36
-
37
-
38
-
39
-
40
-
41
-
42
-
43
-
44
-
45
-
46
-
47
-
48
-
49
-
50
-
51
-
52
-
53
-
54
-
55
-
56
-
57
-
58
-
59
-
60
-
61
-
62
-
63
-
64
-
65
-
66
-
67
-
68
-
69
-
70
-
71
-
72
-
73
-
74
-
75
-
76
-
77
-
78
-
79
-
80
-
81
-
82
-
83
-
84
-
85
-
86
-
87
-
88
-
89
-
90
-
91
-
92
-
93
-
94
-
95
-
96
-
97
-
98
-
99
-
100
-
101
-
 102
102 -
 103
103 -
 104
104 -
 105
105 -
 106
106 -
 107
107 -
 108
108 -
 109
109 -
 110
110 -
 111
111 -
 112
112 -
113
-
114
-
115
-
116
-
117
-
118
-
119
-
120
-
121
-
122
-
123
-
124
-
125
-
126
-
127
-
128
-
129
-
130
-
131
-
132
-
133
-
134
-
135
-
136
-
137
-
138
-
139
-
140
-
141
-
142
-
143
-
144
-
145
-
146
-
147
-
148
-
149
-
150
-
151
-
152
-
153
-
154
-
155
-
156
-
157
-
158
-
159
-
160
-
161
-
162
-
163
-
164
-
165
-
166
-
167
-
168
-
169
-
170
-
171
-
172
-
173
-
174
-
175
-
176
-
177
-
178
-
179
-
180
-
181
-
182
-
183
-
184
-
185
-
186
-
187
-
188
-
189
-
190
-
191
-
192
-
193
-
194
-
195
-
196
-
197
-
198
-
199
-
200
-
201
-
202
-
203
-
204
-
205
-
206
-
207
-
208
-
209
-
210
-
211
-
212
-
213
-
214
-
215
-
216
-
217
-
218
-
219
-
220
-
221
-
222
-
223
-
224
-
225
-
226
-
227
-
228
-
229
-
230
-
231
-
232
-
233
-
234
-
235
-
236
-
237
 |
 |
