Canon REALiS LCOS WUX5800 WUX7500 WUX6700 WUX5800 Users Manual - Page 110
Adjusting the Overlapping Area, Matching Colors in the Overlapping Area
 |
View all Canon REALiS LCOS WUX5800 manuals
Add to My Manuals
Save this manual to your list of manuals |
Page 110 highlights
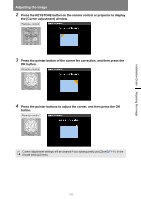
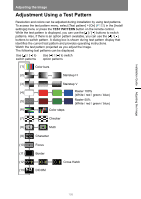
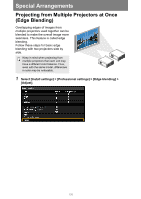
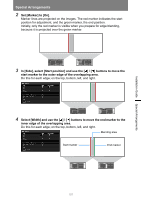
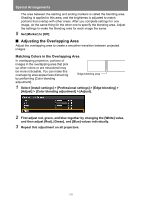
Special Arrangements The area between the starting and ending markers is called the blending area. Shading is applied to this area, and the brightness is adjusted to match portions that overlap with other areas. After you complete settings for one image, do the same thing for the other one to specify the blending area. Adjust the settings to make the blending area for each image the same. 5 Set [Marker] to [Off]. ■ Adjusting the Overlapping Area Adjust the overlapping area to create a smoother transition between projected images. Matching Colors in the Overlapping Area In overlapping projection, portions of images in the overlapping area that pick up other colors or are miscolored may be more noticeable. You can make this overlapping area appear less distracting by performing [Color blending adjustment]. Edge-blending area 1 Select [Install settings] > [Professional settings] > [Edge blending] > [Adjust] > [Color blending adjustment] > [Adjust]. 2 First adjust red, green, and blue together by changing the [White] value, and then adjust [Red], [Green], and [Blue] values individually. 3 Repeat this adjustment on all projectors. 108
-
 1
1 -
2
-
3
-
4
-
5
-
6
-
7
-
8
-
9
-
10
-
11
-
12
-
13
-
14
-
15
-
16
-
17
-
18
-
19
-
20
-
21
-
22
-
23
-
24
-
25
-
26
-
27
-
28
-
29
-
30
-
31
-
32
-
33
-
34
-
35
-
36
-
37
-
38
-
39
-
40
-
41
-
42
-
43
-
44
-
45
-
46
-
47
-
48
-
49
-
50
-
51
-
52
-
53
-
54
-
55
-
56
-
57
-
58
-
59
-
60
-
61
-
62
-
63
-
64
-
65
-
66
-
67
-
68
-
69
-
70
-
71
-
72
-
73
-
74
-
75
-
76
-
77
-
78
-
79
-
80
-
81
-
82
-
83
-
84
-
85
-
86
-
87
-
88
-
89
-
90
-
91
-
92
-
93
-
94
-
95
-
96
-
97
-
98
-
99
-
100
-
101
-
102
-
103
-
104
-
 105
105 -
 106
106 -
 107
107 -
 108
108 -
 109
109 -
 110
110 -
 111
111 -
 112
112 -
 113
113 -
 114
114 -
 115
115 -
116
-
117
-
118
-
119
-
120
-
121
-
122
-
123
-
124
-
125
-
126
-
127
-
128
-
129
-
130
-
131
-
132
-
133
-
134
-
135
-
136
-
137
-
138
-
139
-
140
-
141
-
142
-
143
-
144
-
145
-
146
-
147
-
148
-
149
-
150
-
151
-
152
-
153
-
154
-
155
-
156
-
157
-
158
-
159
-
160
-
161
-
162
-
163
-
164
-
165
-
166
-
167
-
168
-
169
-
170
-
171
-
172
-
173
-
174
-
175
-
176
-
177
-
178
-
179
-
180
-
181
-
182
-
183
-
184
-
185
-
186
-
187
-
188
-
189
-
190
-
191
-
192
-
193
-
194
-
195
-
196
-
197
-
198
-
199
-
200
-
201
-
202
-
203
-
204
-
205
-
206
-
207
-
208
-
209
-
210
-
211
-
212
-
213
-
214
-
215
-
216
-
217
-
218
-
219
-
220
-
221
-
222
-
223
-
224
-
225
-
226
-
227
-
228
-
229
-
230
-
231
-
232
-
233
-
234
-
235
-
236
-
237
 |
 |
