Canon REALiS WX6000 Pro AV User Manual - Page 193
Cleaning and Replacing the Air Filter, Replacing the Air Filter
 |
View all Canon REALiS WX6000 Pro AV manuals
Add to My Manuals
Save this manual to your list of manuals |
Page 193 highlights
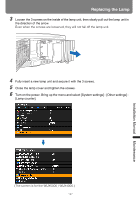
Cleaning and Replacing the Air Filter Replacing the Air Filter Follow the procedure below when replacing the air filter. 1 Turn off the projector power and remove the power plug. 2 Hook your finger onto the handle of the air filter on the side of the projector, and pull the air filter out to remove it. Air filter 3 Remove the filter from the air filter frame. First disengage the tab on the inside, then remove the entire air filter from the frame. 4 Install a new air filter into the frame. First insert the air filter tab into the groove on the handle side of the frame, then press the air filter into the frame. Installation Manual Maintenance 193
-
 1
1 -
2
-
3
-
4
-
5
-
6
-
7
-
8
-
9
-
10
-
11
-
12
-
13
-
14
-
15
-
16
-
17
-
18
-
19
-
20
-
21
-
22
-
23
-
24
-
25
-
26
-
27
-
28
-
29
-
30
-
31
-
32
-
33
-
34
-
35
-
36
-
37
-
38
-
39
-
40
-
41
-
42
-
43
-
44
-
45
-
46
-
47
-
48
-
49
-
50
-
51
-
52
-
53
-
54
-
55
-
56
-
57
-
58
-
59
-
60
-
61
-
62
-
63
-
64
-
65
-
66
-
67
-
68
-
69
-
70
-
71
-
72
-
73
-
74
-
75
-
76
-
77
-
78
-
79
-
80
-
81
-
82
-
83
-
84
-
85
-
86
-
87
-
88
-
89
-
90
-
91
-
92
-
93
-
94
-
95
-
96
-
97
-
98
-
99
-
100
-
101
-
102
-
103
-
104
-
105
-
106
-
107
-
108
-
109
-
110
-
111
-
112
-
113
-
114
-
115
-
116
-
117
-
118
-
119
-
120
-
121
-
122
-
123
-
124
-
125
-
126
-
127
-
128
-
129
-
130
-
131
-
132
-
133
-
134
-
135
-
136
-
137
-
138
-
139
-
140
-
141
-
142
-
143
-
144
-
145
-
146
-
147
-
148
-
149
-
150
-
151
-
152
-
153
-
154
-
155
-
156
-
157
-
158
-
159
-
160
-
161
-
162
-
163
-
164
-
165
-
166
-
167
-
168
-
169
-
170
-
171
-
172
-
173
-
174
-
175
-
176
-
177
-
178
-
179
-
180
-
181
-
182
-
183
-
184
-
185
-
186
-
187
-
 188
188 -
 189
189 -
 190
190 -
 191
191 -
 192
192 -
 193
193 -
 194
194 -
 195
195 -
 196
196 -
 197
197 -
 198
198 -
199
-
200
-
201
-
202
-
203
-
204
-
205
-
206
-
207
-
208
-
209
-
210
-
211
-
212
-
213
-
214
-
215
-
216
-
217
-
218
-
219
-
220
-
221
-
222
-
223
-
224
-
225
-
226
-
227
-
228
-
229
-
230
-
231
-
232
-
233
-
234
-
235
-
236
-
237
-
238
-
239
-
240
 |
 |

193
Installation Manual
Maintenance
Cleaning and Replacing the Air Filter
Replacing the Air Filter
Follow the procedure below when replacing the air filter.
1
Turn off the projector power and remove the power plug.
2
Hook your finger onto the handle of the
air filter on the side of the projector, and
pull the air filter out to remove it.
3
Remove the filter from the air filter
frame. First disengage the tab on the
inside, then remove the entire air filter
from the frame.
4
Install a new air filter into the frame.
First insert the air filter tab into the
groove on the handle side of the frame,
then press the air filter into the frame.
Air filter