Canon REALiS WX6000 Pro AV User Manual - Page 35
AUTO PC button, LAMP button WUX4000
 |
View all Canon REALiS WX6000 Pro AV manuals
Add to My Manuals
Save this manual to your list of manuals |
Page 35 highlights
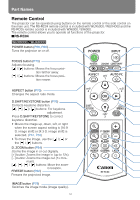
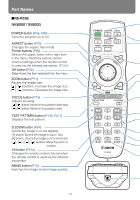
Part Names Before Use INPUT button (P60) Switches the input signal. LENS-SHIFT button (P74) Moves the lens up, down, left, or right. ZOOM button (P71) buttons: Move the lens. Adjusts the image size. [ ] / [ ] buttons: Increase the image size. [ ] / [ ] buttons: Decrease the image size. AUTO PC button (P62) Adjusts tracking etc. automatically in accordance with the signal from a computer when the analog PC input is selected. OK button (P92) Pointer buttons (P90) Confirms the item selected from the menu. Selects the upper, lower, left or right item in the menu and performs remote control channel settings. (P127) MENU button (P88) Displays the menu on the screen and performs remote control channel settings. VOL button (P83) P-TIMER button (P85) Displays the time elapsed since this button was pressed. Adjusts the sound volume. [+] button: Increases the volume. [+-] button: Decreases the volume. MUTE button (P83) BLANK button (P82) Mutes the sound. Toggles between display / non-display of image. LAMP button (WUX4000) (P119) GAMMA button (P113) Adjusts the gamma of the image. Toggles the lamp mode between Standard and Silent. [ ] button: Corrects dark parts of the image so that they are easier to see. [ ] button: Corrects bright parts of the image so that they are easier to see. 35
-
 1
1 -
2
-
3
-
4
-
5
-
6
-
7
-
8
-
9
-
10
-
11
-
12
-
13
-
14
-
15
-
16
-
17
-
18
-
19
-
20
-
21
-
22
-
23
-
24
-
25
-
26
-
27
-
28
-
29
-
 30
30 -
 31
31 -
 32
32 -
 33
33 -
 34
34 -
 35
35 -
 36
36 -
 37
37 -
 38
38 -
 39
39 -
 40
40 -
41
-
42
-
43
-
44
-
45
-
46
-
47
-
48
-
49
-
50
-
51
-
52
-
53
-
54
-
55
-
56
-
57
-
58
-
59
-
60
-
61
-
62
-
63
-
64
-
65
-
66
-
67
-
68
-
69
-
70
-
71
-
72
-
73
-
74
-
75
-
76
-
77
-
78
-
79
-
80
-
81
-
82
-
83
-
84
-
85
-
86
-
87
-
88
-
89
-
90
-
91
-
92
-
93
-
94
-
95
-
96
-
97
-
98
-
99
-
100
-
101
-
102
-
103
-
104
-
105
-
106
-
107
-
108
-
109
-
110
-
111
-
112
-
113
-
114
-
115
-
116
-
117
-
118
-
119
-
120
-
121
-
122
-
123
-
124
-
125
-
126
-
127
-
128
-
129
-
130
-
131
-
132
-
133
-
134
-
135
-
136
-
137
-
138
-
139
-
140
-
141
-
142
-
143
-
144
-
145
-
146
-
147
-
148
-
149
-
150
-
151
-
152
-
153
-
154
-
155
-
156
-
157
-
158
-
159
-
160
-
161
-
162
-
163
-
164
-
165
-
166
-
167
-
168
-
169
-
170
-
171
-
172
-
173
-
174
-
175
-
176
-
177
-
178
-
179
-
180
-
181
-
182
-
183
-
184
-
185
-
186
-
187
-
188
-
189
-
190
-
191
-
192
-
193
-
194
-
195
-
196
-
197
-
198
-
199
-
200
-
201
-
202
-
203
-
204
-
205
-
206
-
207
-
208
-
209
-
210
-
211
-
212
-
213
-
214
-
215
-
216
-
217
-
218
-
219
-
220
-
221
-
222
-
223
-
224
-
225
-
226
-
227
-
228
-
229
-
230
-
231
-
232
-
233
-
234
-
235
-
236
-
237
-
238
-
239
-
240
 |
 |
