Canon S630 Network S630 Quick Start Guide - Page 26
Replacing Ink Tanks, Printing a Nozzle Check Pattern
 |
View all Canon S630 Network manuals
Add to My Manuals
Save this manual to your list of manuals |
Page 26 highlights
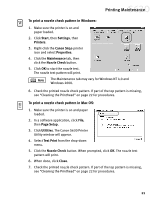
Printing Maintenance Guide on the Setup Software and User's Guide CD-ROM for more information about this feature. By default, Background Printing is off. Replacing Ink Tanks To replace an empty ink tank: 1. With the printer on, open the front cover. The printhead holder will automatically move to the center. 2. Press the tab on the front of the empty ink tank, then remove and discard the empty tank. 3. Remove the new ink tank from its package. Pull the orange tape up, remove the wrapper and twist off the orange protective cap. To avoid spilling ink, never press on the sides of an ink tank. 4. Holding the new ink tank at a slight angle, align it with the correct color slot, then gently insert it. Do not force an ink tank into the printhead. If the ink tank does not go in smoothly, realign it, then try again. 5. Press down on the ink tank until it clicks into place. 6. Close the front cover. Printing a Nozzle Check Pattern The printhead discharges ink through nozzles-tiny openings from which the ink is sprayed. If faded or streaked colors and text appear on your output when you print, some of the nozzles may be clogged. You can check for this problem by printing a nozzle check pattern. 20
-
 1
1 -
2
-
3
-
4
-
5
-
6
-
7
-
8
-
9
-
10
-
11
-
12
-
13
-
14
-
15
-
16
-
17
-
18
-
19
-
20
-
 21
21 -
 22
22 -
 23
23 -
 24
24 -
 25
25 -
 26
26 -
 27
27 -
 28
28 -
 29
29 -
 30
30 -
 31
31 -
32
-
33
-
34
-
35
-
36
-
37
-
38
-
39
-
40
-
41
-
42
-
43
-
44
-
45
-
46
-
47
-
48
-
49
-
50
-
51
-
52
-
53
-
54
-
55
-
56
-
57
-
58
-
59
-
60
 |
 |
