Canon SELPHY DS810 DS810 Photo Printing Guide - Page 12
Rear View, Inside the Printer - paper
 |
View all Canon SELPHY DS810 manuals
Add to My Manuals
Save this manual to your list of manuals |
Page 12 highlights
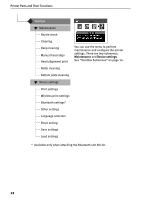
Printer Parts and Their Functions „ Rear View Power Cord Connection Connector used to connect the supplied power cord. „ Inside the Printer Print Head Holder Install the Print Head here. USB Port Connects the printer to a computer through a USB interface. Print Head Lock Lever Locks the Print Head into the Print Head Holder. Once the Print Head is installed, do not touch this lever. Paper Thickness Lever Move to the right when printing. Move to the left if ink smudges or the printed surface is stained. See "Inappropriate paper type used" on page 79. Cover Open Switch Slide to the right to open the Cover. 10
-
 1
1 -
2
-
3
-
4
-
5
-
6
-
 7
7 -
 8
8 -
 9
9 -
 10
10 -
 11
11 -
 12
12 -
 13
13 -
 14
14 -
 15
15 -
 16
16 -
 17
17 -
18
-
19
-
20
-
21
-
22
-
23
-
24
-
25
-
26
-
27
-
28
-
29
-
30
-
31
-
32
-
33
-
34
-
35
-
36
-
37
-
38
-
39
-
40
-
41
-
42
-
43
-
44
-
45
-
46
-
47
-
48
-
49
-
50
-
51
-
52
-
53
-
54
-
55
-
56
-
57
-
58
-
59
-
60
-
61
-
62
-
63
-
64
-
65
-
66
-
67
-
68
-
69
-
70
-
71
-
72
-
73
-
74
-
75
-
76
-
77
-
78
-
79
-
80
-
81
-
82
-
83
-
84
-
85
-
86
-
87
-
88
-
89
-
90
-
91
-
92
-
93
-
94
-
95
-
96
 |
 |

Printer Parts and Their Functions
10
Rear View
USB Port
Connects the printer to a computer through a
USB interface.
Power Cord Connection
Connector used to connect
the supplied power cord.
Inside the Printer
Print Head Lock Lever
Locks the Print Head into the Print Head
Holder.
Once the Print Head is installed,
do not touch this lever.
Paper Thickness Lever
Move to the right when printing.
Move to the left if ink smudges or the printed
surface is stained.
See “Inappropriate paper type used” on page 79.
Print Head Holder
Install the Print Head here.
Cover Open Switch
Slide to the right to open
the Cover.