Canon SELPHY DS810 DS810 Photo Printing Guide - Page 8
Print Head in the Print Head Holder. - ink
 |
View all Canon SELPHY DS810 manuals
Add to My Manuals
Save this manual to your list of manuals |
Page 8 highlights
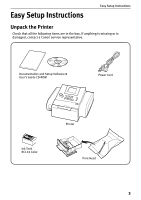
Easy Setup Instructions 3 Take the Print Head from its package and remove the protective cap. Dispose of the protective cap. Print Head Nozzles There might be some transparent or light blue ink on the inside of the bag the Print Head comes in, or the inside of the protective cap this has no effect on print quality. Be careful not to get ink on yourself when handling these items. Notes • Do not touch the Print Head Nozzles. • Do not attempt to reattach the protective cap once it has been 4 mark Observe the mark and place the Print Head Print Head in the Print Head Holder. Print Head Holder 5 Lock the Print Head into place by lowering the Lock Lever. Press down the Lock button until it clicks. Do not touch the Lock Lever once the Print Head has been installed. 6
-
 1
1 -
2
-
 3
3 -
 4
4 -
 5
5 -
 6
6 -
 7
7 -
 8
8 -
 9
9 -
 10
10 -
 11
11 -
 12
12 -
 13
13 -
14
-
15
-
16
-
17
-
18
-
19
-
20
-
21
-
22
-
23
-
24
-
25
-
26
-
27
-
28
-
29
-
30
-
31
-
32
-
33
-
34
-
35
-
36
-
37
-
38
-
39
-
40
-
41
-
42
-
43
-
44
-
45
-
46
-
47
-
48
-
49
-
50
-
51
-
52
-
53
-
54
-
55
-
56
-
57
-
58
-
59
-
60
-
61
-
62
-
63
-
64
-
65
-
66
-
67
-
68
-
69
-
70
-
71
-
72
-
73
-
74
-
75
-
76
-
77
-
78
-
79
-
80
-
81
-
82
-
83
-
84
-
85
-
86
-
87
-
88
-
89
-
90
-
91
-
92
-
93
-
94
-
95
-
96
 |
 |
