Canon SELPHY DS810 DS810 Photo Printing Guide - Page 7
Installing the Print Head
 |
View all Canon SELPHY DS810 manuals
Add to My Manuals
Save this manual to your list of manuals |
Page 7 highlights
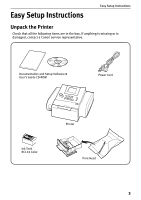
4 Select the display language. Easy Setup Instructions (1) Press the ST buttons to select the language you want to display on the LCD. (2) Press the OK button. Note If you accidentally changed the languages, see "Language selection" on page 44 to select your language. Installing the Print Head 1 Slide the Cover Open Switch toward the right to open the Cover. The Print Head Holder moves to the center. 2 Press the Lock button, then raise the Lock Lever. Do not touch internal parts other than the Lock Lever. 5
-
 1
1 -
 2
2 -
 3
3 -
 4
4 -
 5
5 -
 6
6 -
 7
7 -
 8
8 -
 9
9 -
 10
10 -
 11
11 -
 12
12 -
13
-
14
-
15
-
16
-
17
-
18
-
19
-
20
-
21
-
22
-
23
-
24
-
25
-
26
-
27
-
28
-
29
-
30
-
31
-
32
-
33
-
34
-
35
-
36
-
37
-
38
-
39
-
40
-
41
-
42
-
43
-
44
-
45
-
46
-
47
-
48
-
49
-
50
-
51
-
52
-
53
-
54
-
55
-
56
-
57
-
58
-
59
-
60
-
61
-
62
-
63
-
64
-
65
-
66
-
67
-
68
-
69
-
70
-
71
-
72
-
73
-
74
-
75
-
76
-
77
-
78
-
79
-
80
-
81
-
82
-
83
-
84
-
85
-
86
-
87
-
88
-
89
-
90
-
91
-
92
-
93
-
94
-
95
-
96
 |
 |

Easy Setup Instructions
5
4
Select the display language.
(1)
Press the
buttons to select the language you want to display on the LCD.
(2)
Press the
OK
button.
Note
If you accidentally changed the languages, see “Language selection” on page 44 to
select your language.
Installing the Print Head
1
Slide the Cover Open Switch
toward the right to open the Cover.
The Print Head Holder moves to the
center.
2
Press the Lock button, then raise
the Lock Lever.
Do not touch internal parts other than
the Lock Lever.