Canon iP4600 User Manual - Page 20
Make sure that Automatically Select is selected in Paper Source. - printer driver
 |
UPC - 013803093728
View all Canon iP4600 manuals
Add to My Manuals
Save this manual to your list of manuals |
Page 20 highlights
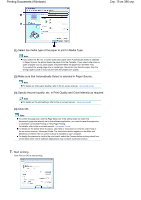
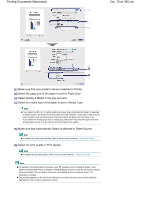
Printing Documents (Macintosh) 6. Specify the required print settings. Стр. 20 из 396 стр. (1) Select Print on the File menu in your software application. The Print dialog box appears. (2) Make sure that your printer's name is selected in Printer. (3) Select Quality & Media in the pop-up menu. (4) Select the media type of the paper to print in Media Type. Note If you select A4, B5, A5, or Letter-sized plain paper when Automatically Select is selected in Paper Source, the printer feeds the paper from the Cassette. If you select other sizes or types of paper such as photo paper, the printer feeds the paper from the Rear Tray. If you select the wrong page size or media type, the printer may feed the paper from the wrong paper source or may not print with the proper print quality. (5) Make sure that Automatically Select is selected in Paper Source. Note For details on other paper feeding, refer to the on-screen manual: Advanced Guide. (6) Select the print quality in Print Quality. Note For details on the print quality, refer to the on-screen manual: Advanced Guide. Note For details on the printer driver functions, click (Question) on the Quality & Media, Color Options, Special Effects, Borderless Printing, or Duplex Printing & Margin screen to view the on-screen manual: Advanced Guide. If the on-screen manual is not installed, it does not appear even if (Question) is clicked. To display the preview to confirm the print result, click Preview. Some software applications may not have a preview function. 7. Start printing. Click Print to start printing. Note Click the printer icon in the Dock to display the list of print jobs in progress. To cancel a print job in progress, select the desired job in the Name list and click Delete. After canceling the print job, blank sheets of paper may be ejected. To temporarily stop a job in progress, click Hold. To temporarily stop all the jobs in the list, click Stop Jobs. If printed ruled lines are misaligned or print results are unsatisfactory, adjust the print head position. See Aligning the Print Head.
-
 1
1 -
2
-
3
-
4
-
5
-
6
-
7
-
8
-
9
-
10
-
11
-
12
-
13
-
14
-
 15
15 -
 16
16 -
 17
17 -
 18
18 -
 19
19 -
 20
20 -
 21
21 -
 22
22 -
 23
23 -
 24
24 -
 25
25 -
26
-
27
-
28
-
29
-
30
-
31
-
32
-
33
-
34
-
35
-
36
-
37
-
38
-
39
-
40
-
41
-
42
-
43
-
44
-
45
-
46
-
47
-
48
-
49
-
50
-
51
-
52
-
53
-
54
-
55
-
56
-
57
-
58
-
59
-
60
-
61
-
62
-
63
-
64
-
65
-
66
-
67
-
68
-
69
-
70
-
71
-
72
-
73
-
74
-
75
-
76
-
77
-
78
-
79
-
80
-
81
-
82
-
83
-
84
-
85
-
86
-
87
-
88
-
89
-
90
-
91
-
92
-
93
-
94
-
95
-
96
-
97
-
98
-
99
-
100
-
101
-
102
-
103
-
104
-
105
-
106
-
107
-
108
-
109
-
110
-
111
-
112
-
113
-
114
-
115
-
116
-
117
-
118
-
119
-
120
-
121
-
122
-
123
-
124
-
125
-
126
-
127
-
128
-
129
-
130
-
131
-
132
-
133
-
134
-
135
-
136
-
137
-
138
-
139
-
140
-
141
-
142
-
143
-
144
-
145
-
146
-
147
-
148
-
149
-
150
-
151
-
152
-
153
-
154
-
155
-
156
-
157
-
158
-
159
-
160
-
161
-
162
-
163
-
164
-
165
-
166
-
167
-
168
-
169
-
170
-
171
-
172
-
173
-
174
-
175
-
176
-
177
-
178
-
179
-
180
-
181
-
182
-
183
-
184
-
185
-
186
-
187
-
188
-
189
-
190
-
191
-
192
-
193
-
194
-
195
-
196
-
197
-
198
-
199
-
200
-
201
-
202
-
203
-
204
-
205
-
206
-
207
-
208
-
209
-
210
-
211
-
212
-
213
-
214
-
215
-
216
-
217
-
218
-
219
-
220
-
221
-
222
-
223
-
224
-
225
-
226
-
227
-
228
-
229
-
230
-
231
-
232
-
233
-
234
-
235
-
236
-
237
-
238
-
239
-
240
-
241
-
242
-
243
-
244
-
245
-
246
-
247
-
248
-
249
-
250
-
251
-
252
-
253
-
254
-
255
-
256
-
257
-
258
-
259
-
260
-
261
-
262
-
263
-
264
-
265
-
266
-
267
-
268
-
269
-
270
-
271
-
272
-
273
-
274
-
275
-
276
-
277
-
278
-
279
-
280
-
281
-
282
-
283
-
284
-
285
-
286
-
287
-
288
-
289
-
290
-
291
-
292
-
293
-
294
-
295
-
296
-
297
-
298
-
299
-
300
-
301
-
302
-
303
-
304
-
305
-
306
-
307
-
308
-
309
-
310
-
311
-
312
-
313
-
314
-
315
-
316
-
317
-
318
-
319
-
320
-
321
-
322
-
323
-
324
-
325
-
326
-
327
-
328
-
329
-
330
-
331
-
332
-
333
-
334
-
335
-
336
-
337
-
338
-
339
-
340
-
341
-
342
-
343
-
344
-
345
-
346
-
347
-
348
-
349
-
350
-
351
-
352
-
353
-
354
-
355
-
356
-
357
-
358
-
359
-
360
-
361
-
362
-
363
-
364
-
365
-
366
-
367
-
368
-
369
-
370
-
371
-
372
-
373
-
374
-
375
-
376
-
377
-
378
-
379
-
380
-
381
-
382
-
383
-
384
-
385
-
386
-
387
-
388
-
389
-
390
-
391
-
392
-
393
-
394
-
395
-
396
 |
 |
