Canon imageCLASS MF5950dw imageCLASS MF5960dn/MF5950dw Basic Operation Guide - Page 144
Paper Jams in the Output Area, Paper Jams in the Multi-Purpose Tray
 |
View all Canon imageCLASS MF5950dw manuals
Add to My Manuals
Save this manual to your list of manuals |
Page 144 highlights
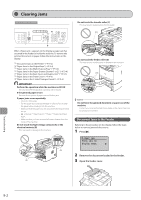
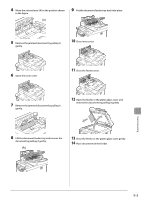
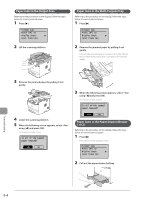
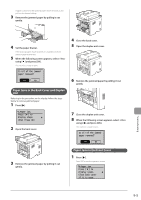
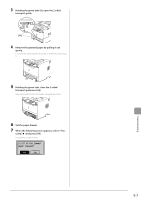
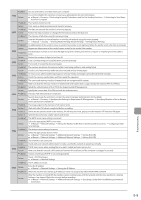
Paper Jams in the Output Area Referring to the procedure on the display, follow the steps below to remove jammed paper. 1 Press [ ]. Paper jam. Press [ ] to display steps. (End: Press OK) 2 Lift the scanning platform. Paper Jams in the Multi-Purpose Tray Referring to the procedure on the display, follow the steps below to remove jammed paper. 1 Press [ ]. Paper jam. Press [ ] to display steps. (End: Press OK) 2 Remove the jammed paper by pulling it out gently. If it cannot be removed easily, do not pull it out forcibly. Perform the procedure at the position that is indicated on the message display. 3 Remove the jammed paper by pulling it out gently. 4 Lower the scanning platform. 5 When the following screen appears, select using [ ] and press [OK]. The machine is ready to print. Is all of the jammed paper removed? Yes No 3 When the following screen appears, select using [ ] and press [OK]. The machine is ready to print. Is all of the jammed paper removed? Yes No Paper Jams in the Paper Drawer (Drawer 1 or 2) Referring to the procedure on the display, follow the steps below to remove jammed paper. 1 Press [ ]. Press [OK] to exit the operation screen. Paper jam. Press [ ] to display steps. (End: Press OK) 2 Pull out the paper drawer halfway. Troubleshooting 9-4
-
 1
1 -
2
-
3
-
4
-
5
-
6
-
7
-
8
-
9
-
10
-
11
-
12
-
13
-
14
-
15
-
16
-
17
-
18
-
19
-
20
-
21
-
22
-
23
-
24
-
25
-
26
-
27
-
28
-
29
-
30
-
31
-
32
-
33
-
34
-
35
-
36
-
37
-
38
-
39
-
40
-
41
-
42
-
43
-
44
-
45
-
46
-
47
-
48
-
49
-
50
-
51
-
52
-
53
-
54
-
55
-
56
-
57
-
58
-
59
-
60
-
61
-
62
-
63
-
64
-
65
-
66
-
67
-
68
-
69
-
70
-
71
-
72
-
73
-
74
-
75
-
76
-
77
-
78
-
79
-
80
-
81
-
82
-
83
-
84
-
85
-
86
-
87
-
88
-
89
-
90
-
91
-
92
-
93
-
94
-
95
-
96
-
97
-
98
-
99
-
100
-
101
-
102
-
103
-
104
-
105
-
106
-
107
-
108
-
109
-
110
-
111
-
112
-
113
-
114
-
115
-
116
-
117
-
118
-
119
-
120
-
121
-
122
-
123
-
124
-
125
-
126
-
127
-
128
-
129
-
130
-
131
-
132
-
133
-
134
-
135
-
136
-
137
-
138
-
 139
139 -
 140
140 -
 141
141 -
 142
142 -
 143
143 -
 144
144 -
 145
145 -
 146
146 -
 147
147 -
 148
148 -
 149
149 -
150
-
151
-
152
-
153
-
154
-
155
-
156
-
157
-
158
-
159
-
160
-
161
-
162
-
163
-
164
-
165
-
166
-
167
-
168
-
169
-
170
-
171
-
172
-
173
-
174
-
175
-
176
 |
 |
