Canon imageCLASS MF5950dw imageCLASS MF5960dn/MF5950dw Basic Operation Guide - Page 26
Names and Functions on Each Part of the Machine, Front Side
 |
View all Canon imageCLASS MF5950dw manuals
Add to My Manuals
Save this manual to your list of manuals |
Page 26 highlights
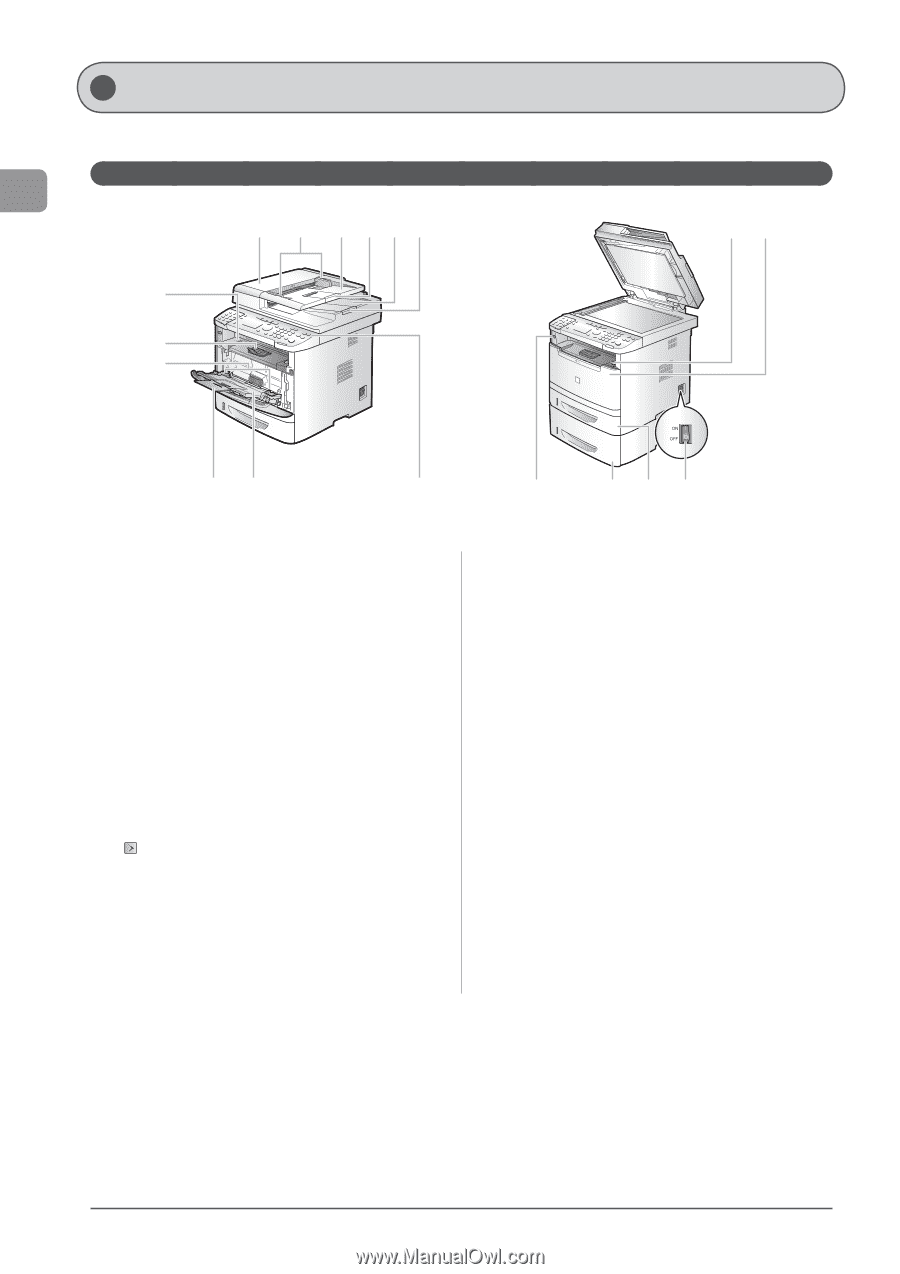
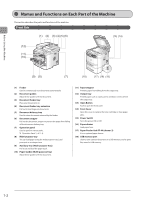
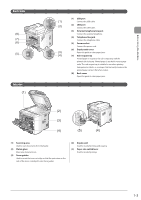
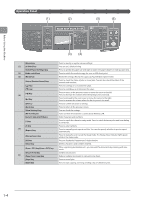
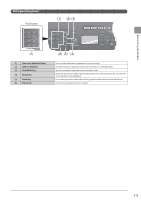
Before Using the Machine Names and Functions on Each Part of the Machine This section describes the parts and functions of the machine. Front Side (1) (2) (3) (4) (5) (6) (13) (14) (12) (11) (10) (9) (8) (7) (18) (17) (16) (15) (1) Feeder Used to continuously scan documents automatically. (2) Document guides Adjust these guides to fit the document. (3) Document feeder tray Place your documents on. (4) Document feeder tray extention Pull out to load large size documents. (5) Document delivery tray Used to store documents returned by the feeder. (6) Document stopper Pull out the document stopper to prevent the paper from falling off the document delivery tray. (7) Operation panel Used to perform various tasks. "Operation Panel" (→P. 1-4) (8) Multi-purpose tray You can load paper using the multi-purpose tray. Load postcards or envelopes here. (9) Auxiliary Tray (Multi-purpose Tray) Pull it out and load the paper stack. (10) Paper Guides (Multi-purpose Tray) Adjust these guides to fit the document. (11) Paper stopper Prevents paper from falling from the output tray. (12) Output tray Printed paper such as copies, prints and faxes come out from the output tray. (13) Open Button Push to open the front cover. (14) Front Cover Open this cover to replace the toner cartridge or clear paper jams. (15) Power Switch Turns the power ON or OFF. (16) Paper drawer Load paper here. (17) Paper Feeder Unit PF-44 (drawer 2) It is an optional paper drawer. (18) USB memory port Used to save scanned documents in a USB memory, and to print files saved in USB memory. 1-2
-
 1
1 -
2
-
3
-
4
-
5
-
6
-
7
-
8
-
9
-
10
-
11
-
12
-
13
-
14
-
15
-
16
-
17
-
18
-
19
-
20
-
 21
21 -
 22
22 -
 23
23 -
 24
24 -
 25
25 -
 26
26 -
 27
27 -
 28
28 -
 29
29 -
 30
30 -
 31
31 -
32
-
33
-
34
-
35
-
36
-
37
-
38
-
39
-
40
-
41
-
42
-
43
-
44
-
45
-
46
-
47
-
48
-
49
-
50
-
51
-
52
-
53
-
54
-
55
-
56
-
57
-
58
-
59
-
60
-
61
-
62
-
63
-
64
-
65
-
66
-
67
-
68
-
69
-
70
-
71
-
72
-
73
-
74
-
75
-
76
-
77
-
78
-
79
-
80
-
81
-
82
-
83
-
84
-
85
-
86
-
87
-
88
-
89
-
90
-
91
-
92
-
93
-
94
-
95
-
96
-
97
-
98
-
99
-
100
-
101
-
102
-
103
-
104
-
105
-
106
-
107
-
108
-
109
-
110
-
111
-
112
-
113
-
114
-
115
-
116
-
117
-
118
-
119
-
120
-
121
-
122
-
123
-
124
-
125
-
126
-
127
-
128
-
129
-
130
-
131
-
132
-
133
-
134
-
135
-
136
-
137
-
138
-
139
-
140
-
141
-
142
-
143
-
144
-
145
-
146
-
147
-
148
-
149
-
150
-
151
-
152
-
153
-
154
-
155
-
156
-
157
-
158
-
159
-
160
-
161
-
162
-
163
-
164
-
165
-
166
-
167
-
168
-
169
-
170
-
171
-
172
-
173
-
174
-
175
-
176
 |
 |