Canon imageCLASS MF5950dw imageCLASS MF5960dn/MF5950dw Basic Operation Guide - Page 27
Back Side, Interior, Sub-output tray
 |
View all Canon imageCLASS MF5950dw manuals
Add to My Manuals
Save this manual to your list of manuals |
Page 27 highlights
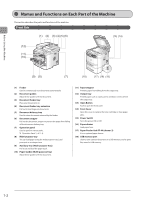
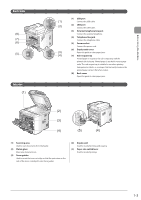
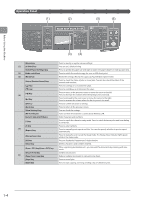
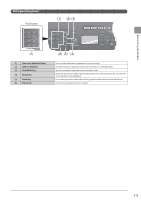
Before Using the Machine Back Side (8) (7) (6) (5) Interior (1) (1) USB port (1) Connect the USB cable. (2) (2) LAN port Connect the LAN cable. (3) External telephone line jack Connect the external telephone. (4) Telephone line jack Connect the telephone cable. (5) Power socket Connect the power cord. (6) Duplex unit cover (3) Open this guide to clear paper jams. (4) (7) Sub-output tray Printed paper is output to the sub-output tray with the printed side facing up. Printed paper is stacked in reverse page order. The sub-output tray is suitable for use when printing transparencies, labels, or envelopes that curl easily, because the printed paper remains flat when output. (8) Back cover Open this guide to clear paper jams. (2) (3) (4) (5) (4) (1) Scanning area Used to scan documents from the feeder. (2) Platen glass Place your documents on. (3) Toner guides Used to insert the toner cartridge so that the protrusion on the side of the toner cartridge fits into these guides. (4) Duplex unit Used for 2-sided printing and copying. (5) Paper size switch lever Used for 2-sided printing. 1-3
-
 1
1 -
2
-
3
-
4
-
5
-
6
-
7
-
8
-
9
-
10
-
11
-
12
-
13
-
14
-
15
-
16
-
17
-
18
-
19
-
20
-
21
-
 22
22 -
 23
23 -
 24
24 -
 25
25 -
 26
26 -
 27
27 -
 28
28 -
 29
29 -
 30
30 -
 31
31 -
 32
32 -
33
-
34
-
35
-
36
-
37
-
38
-
39
-
40
-
41
-
42
-
43
-
44
-
45
-
46
-
47
-
48
-
49
-
50
-
51
-
52
-
53
-
54
-
55
-
56
-
57
-
58
-
59
-
60
-
61
-
62
-
63
-
64
-
65
-
66
-
67
-
68
-
69
-
70
-
71
-
72
-
73
-
74
-
75
-
76
-
77
-
78
-
79
-
80
-
81
-
82
-
83
-
84
-
85
-
86
-
87
-
88
-
89
-
90
-
91
-
92
-
93
-
94
-
95
-
96
-
97
-
98
-
99
-
100
-
101
-
102
-
103
-
104
-
105
-
106
-
107
-
108
-
109
-
110
-
111
-
112
-
113
-
114
-
115
-
116
-
117
-
118
-
119
-
120
-
121
-
122
-
123
-
124
-
125
-
126
-
127
-
128
-
129
-
130
-
131
-
132
-
133
-
134
-
135
-
136
-
137
-
138
-
139
-
140
-
141
-
142
-
143
-
144
-
145
-
146
-
147
-
148
-
149
-
150
-
151
-
152
-
153
-
154
-
155
-
156
-
157
-
158
-
159
-
160
-
161
-
162
-
163
-
164
-
165
-
166
-
167
-
168
-
169
-
170
-
171
-
172
-
173
-
174
-
175
-
176
 |
 |
