Canon imageCLASS MF5950dw imageCLASS MF5960dn/MF5950dw Basic Operation Guide - Page 28
Operation Panel, Paper Save Copy] key
 |
View all Canon imageCLASS MF5950dw manuals
Add to My Manuals
Save this manual to your list of manuals |
Page 28 highlights
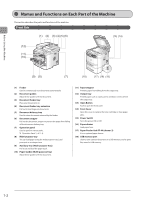
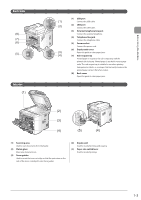
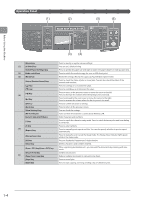
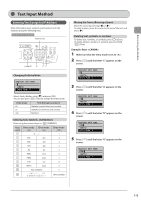
Operation Panel (1) (2) (5) (6) Before Using the Machine (3) (4) [Menu] key (1) [2-Sided] key [Select Paper/Settings] key (2) Mode switch keys (3) [Reset] key [Status Monitor/Cancel] key [ ] Key [ ] Key [ ] Key (4) [ ] Key [OK] key [Back] key [View Settings] key [Wi-Fi] indicator Numeric keys ([0]-[9] keys) [*] key [#] key (5) [Report] key [Energy Saver] key [ID] key [Clear] key [Scan > PC1] key/[Scan > PC2] key [Secure Print] key (6) [Paper Save Copy] key [Stop] key [Start] key Press to specify or register various settings. You can set 2-sided printing. Press to specify the paper size and type to load in the paper drawer or multi-purpose tray. Press to switch the mode to copy, fax, scan or USB direct print. Resets the settings. (Resets the copy/scan/fax/USB direct print mode.) Press to check the status of jobs or cancel jobs. You can also check the status of the network and machine. Press to scroll up or to increase the value. Press to scroll down or to decrease the value. Press to return to the previous screen or move the cursor to the left. Press to decrease the volume when the fax ring tone is too loud. Press to proceed to the next screen or move the cursor to the right. Press to increase the volume when the fax ring tone is too small. Press to confirm an action or setting. Press to return to the previous screen. You can check the settings. Turns on when the machine is connected to Wireless LAN. Enter characters and numbers. Press to switch the character entry mode. Press to switch between pulse and tone dialing to send a fax. Press to enter symbols. Press to manually print reports and lists. You can also specify whether to print a report automatically. Press to manually set or cancel the Sleep mode. The Energy Saver indicator lights green while in the sleep mode. Press to display the Department ID login window. Deletes characters and numbers entered. When registering destinations etc., you can send the documents by scanning with onetouch. Used for secure print. Reduce multiple documents to copy onto one sheet. Press to cancel jobs. Press to start copying, scanning, sending a fax or USB direct print. 1-4
-
 1
1 -
2
-
3
-
4
-
5
-
6
-
7
-
8
-
9
-
10
-
11
-
12
-
13
-
14
-
15
-
16
-
17
-
18
-
19
-
20
-
21
-
22
-
 23
23 -
 24
24 -
 25
25 -
 26
26 -
 27
27 -
 28
28 -
 29
29 -
 30
30 -
 31
31 -
 32
32 -
 33
33 -
34
-
35
-
36
-
37
-
38
-
39
-
40
-
41
-
42
-
43
-
44
-
45
-
46
-
47
-
48
-
49
-
50
-
51
-
52
-
53
-
54
-
55
-
56
-
57
-
58
-
59
-
60
-
61
-
62
-
63
-
64
-
65
-
66
-
67
-
68
-
69
-
70
-
71
-
72
-
73
-
74
-
75
-
76
-
77
-
78
-
79
-
80
-
81
-
82
-
83
-
84
-
85
-
86
-
87
-
88
-
89
-
90
-
91
-
92
-
93
-
94
-
95
-
96
-
97
-
98
-
99
-
100
-
101
-
102
-
103
-
104
-
105
-
106
-
107
-
108
-
109
-
110
-
111
-
112
-
113
-
114
-
115
-
116
-
117
-
118
-
119
-
120
-
121
-
122
-
123
-
124
-
125
-
126
-
127
-
128
-
129
-
130
-
131
-
132
-
133
-
134
-
135
-
136
-
137
-
138
-
139
-
140
-
141
-
142
-
143
-
144
-
145
-
146
-
147
-
148
-
149
-
150
-
151
-
152
-
153
-
154
-
155
-
156
-
157
-
158
-
159
-
160
-
161
-
162
-
163
-
164
-
165
-
166
-
167
-
168
-
169
-
170
-
171
-
172
-
173
-
174
-
175
-
176
 |
 |
