Casio CTK 671 User Guide - Page 35
Using Auto Harmonize, Finishing with an Ending Pattern, Using One-touch Preset
 |
UPC - 079767312459
View all Casio CTK 671 manuals
Add to My Manuals
Save this manual to your list of manuals |
Page 35 highlights
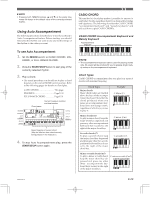
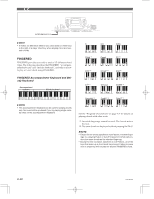
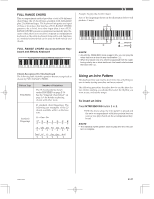
Finishing with an Ending Pattern You can end your performances with an ending pattern that brings the rhythm pattern you are using to a natural-sounding conclusion. The following procedure describes how to insert an ending pattern. Note that the actual ending pattern played depends on the rhythm pattern you are using. To finish with an ending pattern While the rhythm is playing, press INTRO/ENDING button 1 or 2. • The timing when the ending pattern starts depends on when you press the INTRO/ENDING button 1 or 2. If you press the button before the second beat of the current measure, the ending pattern starts playing immediately. ❚ NOTE • Pressing the button at any point in the measure after the second beat results in the ending pattern playing from the beginning of the following measure. Using One-touch Preset One-touch preset automatically makes the main settings listed below in accordance with the rhythm pattern you are using. • Keyboard tone • Layer on/off • Tempo • Effect type • Harmonize on/off To use one-touch preset 1. Select the rhythm you want to use. 2. Use the MODE switch to select the accompani- ment mode you want to use. 3. Press the ONE TOUCH PRESET button. • This automatically makes the one-touch preset settings in accordance with the rhythm you selected. • The keyboard automatically enters synchro standby at this time. 4. Start rhythm and Auto Accompaniment, and play something on the keyboard. • Accompaniment is played using the one-touch preset settings. Using Auto Harmonize When you are using Auto Accompaniment, Auto Harmonize automatically adds three additional notes to your melody in accordance with the chord that is being played. The result is a harmony effect that makes your melody line richer and fuller. To use Auto Harmonize 1. Use the MODE switch to select FINGERED or CASIO CHORD as the accompaniment mode. 2. Press AUTO HARMONIZE to turn on Auto Har- monize. • This causes an indicator to appear next to AUTO HARMONIZE on the display. 3. Start Auto Accompaniment play, and play some- thing on the keyboard. 4. To turn off Auto Harmonize, press AUTO HAR- MONIZE once. • This causes the indicator next to AUTO HARMONIZE to disappear. ❚ NOTE • Auto Harmonize turns off temporarily whenever you start demo tune play. It turns back on as soon as the operation or function that caused it to turn off is finished. • Auto Harmonize is enabled only when the Auto Accompaniment mode is FINGERED or CASIO CHORD. 703A-E-035A E-33
-
 1
1 -
2
-
3
-
4
-
5
-
6
-
7
-
8
-
9
-
10
-
11
-
12
-
13
-
14
-
15
-
16
-
17
-
18
-
19
-
20
-
21
-
22
-
23
-
24
-
25
-
26
-
27
-
28
-
29
-
 30
30 -
 31
31 -
 32
32 -
 33
33 -
 34
34 -
 35
35 -
 36
36 -
 37
37 -
 38
38 -
 39
39 -
 40
40 -
41
-
42
-
43
-
44
-
45
-
46
-
47
-
48
-
49
-
50
-
51
-
52
-
53
-
54
-
55
-
56
-
57
-
58
-
59
-
60
-
61
-
62
-
63
-
64
-
65
-
66
-
67
-
68
-
69
-
70
-
71
-
72
-
73
-
74
-
75
-
76
-
77
-
78
-
79
-
80
-
81
-
82
-
83
-
84
-
85
-
86
-
87
-
88
-
89
-
90
-
91
-
92
-
93
-
94
-
95
-
96
-
97
-
98
 |
 |