Cisco E2100L User Guide - Page 20
Wireless > Basic Wireless Settings, Manual Setup, Destination LAN IP - wireless router
 |
View all Cisco E2100L manuals
Add to My Manuals
Save this manual to your list of manuals |
Page 20 highlights
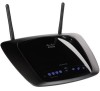
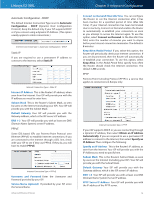
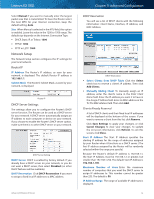
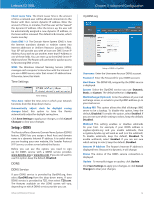
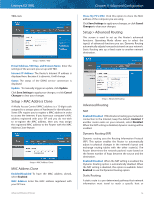
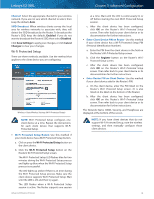
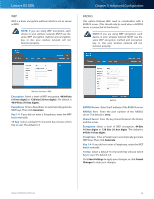
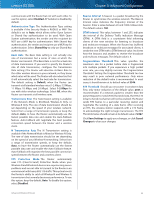
Linksys E2100L network. Enter the information described below to set up a new static route. Route Entries To set up a static route between the Router and another network, select a number from the dropdown list. Click Delete This Entry to delete a static route. Enter Route Name Enter a name for the Route here, using a maximum of 25 alphanumeric characters. Destination LAN IP The Destination LAN (Local Area Network) IP is the address of the remote network or host to which you want to assign a static route. Subnet Mask The Subnet Mask determines which portion of a Destination LAN IP address is the network portion, and which portion is the host portion. Gateway This is the IP address of the gateway device that allows for contact between the Router and the remote network or host. Interface This interface tells you whether the Destination IP Address is on the LAN & Wireless (Ethernet and wireless networks) or the Internet (WAN). (WAN stands for Wide Area Network.) Click Show Routing Table to view the static routes you have already set up. Advanced Routing > Routing Table Routing Table For each route, the Destination LAN IP address, Subnet Mask, Gateway, Hop Count, and Interface are displayed. Click Refresh to update the information. Click Close to exit this screen. Click Save Settings to apply your changes, or click Cancel Changes to clear your changes. Wireless > Basic Wireless Settings The basic settings for wireless networking are set on this screen. There are two ways to configure the Router's wireless network(s), manual and Wi-Fi Protected Setup. Wi-Fi Protected Setup is a feature that makes it easy to set up your wireless network. If you have client devices, such as wireless adapters, that support Wi-Fi Protected Setup, then you can use Wi-Fi Protected Setup. Wireless Configuration To manually configure your wireless networks, select Manual. Proceed to the Manual Advanced Wireless-N Router Chapter 3: Advanced Configuration Setup section. To use Wi-Fi Protected Setup, select Wi-Fi Protected Setup. Proceed to Wi-Fi Protected Setup, page 18. Manual Setup If you set the Wireless Configuration to Manual, the Basic Wireless Settings screen displays the following fields. Wireless > Basic Wireless Settings (Manual Setup) Network Mode From this drop-down menu, you can select the wireless standards running on your network. •• Mixed If you have Wireless-N, Wireless-G, and Wireless-B devices in your network, keep the default, Mixed. •• BG-Mixed If you have only Wireless-G and Wireless-B devices in your network, select BG-Mixed. •• Wireless-N Only If you have only Wireless-N devices, select Wireless-N Only. •• Wireless-G Only If you have only Wireless-G devices, select Wireless-G Only. •• Wireless-B Only If you have only Wireless-B devices, select Wireless-B Only. •• Disabled If you do not have any wireless devices in your network, select Disabled. NOTE: If you are not sure which mode to use, keep the default, Mixed. Network Name (SSID) The SSID (Service Set Identifier) is the network name shared by all devices in a wireless network. It is case‑sensitive and must not exceed 32 keyboard characters. The default is Ciscoxxxxx (xxxxx are the last five digits of the Router's serial number). The serial number is located on the left side of the product label, which is on the bottom panel. Channel Width The default is Standard - 20 MHz Channel. For best performance, select Auto to have the Router automatically select the Channel Width (20 MHz or 40 MHz). 17
-
 1
1 -
2
-
3
-
4
-
5
-
6
-
7
-
8
-
9
-
10
-
11
-
12
-
13
-
14
-
 15
15 -
 16
16 -
 17
17 -
 18
18 -
 19
19 -
 20
20 -
 21
21 -
 22
22 -
 23
23 -
 24
24 -
 25
25 -
26
-
27
-
28
-
29
-
30
-
31
-
32
-
33
-
34
-
35
-
36
-
37
-
38
-
39
-
40
-
41
-
42
-
43
-
44
-
45
-
46
-
47
-
48
-
49
-
50
-
51
-
52
-
53
-
54
-
55
-
56
-
57
-
58
-
59
-
60
-
61
-
62
-
63
-
64
-
65
-
66
-
67
-
68
-
69
-
70
-
71
-
72
-
73
-
74
-
75
-
76
-
77
-
78
 |
 |