Compaq Pro 6300 Maintenance & Service Guide Elite 8300 Touch All-in-One Bu - Page 122
Replace the backlight cable with the new backlight cable that comes with the new
 |
View all Compaq Pro 6300 manuals
Add to My Manuals
Save this manual to your list of manuals |
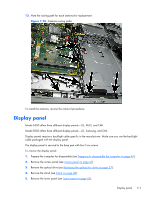
Page 122 highlights
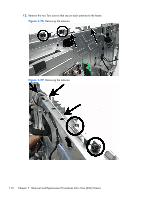
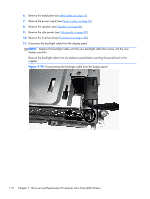
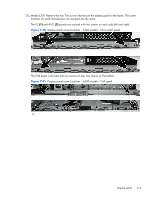
6. Remove the metal plate (see Metal plate on page 51). 7. Remove the power supply (see Power supply on page 90). 8. Remove the speakers (see Speakers on page 86). 9. Remove the side panels (see Side panels on page 88). 10. Remove the front bezel (see Front bezel on page 105). 11. Disconnect the backlight cable from the display panel. NOTE: Replace the backlight cable with the new backlight cable that comes with the new display panel kit. Remove the backlight cable from the defective panel before sending the panel back to the supplier. Figure 7-79 Disconnecting the backlight cable from the display panel 112 Chapter 7 Removal and Replacement Procedures All-in One (AIO) Chassis
-
 1
1 -
2
-
3
-
4
-
5
-
6
-
7
-
8
-
9
-
10
-
11
-
12
-
13
-
14
-
15
-
16
-
17
-
18
-
19
-
20
-
21
-
22
-
23
-
24
-
25
-
26
-
27
-
28
-
29
-
30
-
31
-
32
-
33
-
34
-
35
-
36
-
37
-
38
-
39
-
40
-
41
-
42
-
43
-
44
-
45
-
46
-
47
-
48
-
49
-
50
-
51
-
52
-
53
-
54
-
55
-
56
-
57
-
58
-
59
-
60
-
61
-
62
-
63
-
64
-
65
-
66
-
67
-
68
-
69
-
70
-
71
-
72
-
73
-
74
-
75
-
76
-
77
-
78
-
79
-
80
-
81
-
82
-
83
-
84
-
85
-
86
-
87
-
88
-
89
-
90
-
91
-
92
-
93
-
94
-
95
-
96
-
97
-
98
-
99
-
100
-
101
-
102
-
103
-
104
-
105
-
106
-
107
-
108
-
109
-
110
-
111
-
112
-
113
-
114
-
115
-
116
-
 117
117 -
 118
118 -
 119
119 -
 120
120 -
 121
121 -
 122
122 -
 123
123 -
 124
124 -
 125
125 -
 126
126 -
 127
127 -
128
-
129
-
130
-
131
-
132
-
133
-
134
-
135
-
136
-
137
-
138
-
139
-
140
-
141
-
142
-
143
-
144
-
145
-
146
-
147
-
148
-
149
-
150
-
151
-
152
-
153
-
154
-
155
-
156
-
157
-
158
-
159
-
160
-
161
-
162
-
163
-
164
-
165
-
166
-
167
-
168
-
169
-
170
-
171
-
172
-
173
-
174
-
175
-
176
-
177
-
178
-
179
-
180
-
181
-
182
-
183
-
184
-
185
-
186
-
187
-
188
-
189
-
190
-
191
-
192
-
193
-
194
-
195
-
196
-
197
-
198
-
199
-
200
-
201
-
202
-
203
-
204
-
205
-
206
-
207
-
208
 |
 |

6.
Remove the metal plate (see
Metal plate
on page
51
).
7.
Remove the power supply (see
Power supply
on page
90
).
8.
Remove the speakers (see
Speakers
on page
86
).
9.
Remove the side panels (see
Side panels
on page
88
).
10.
Remove the front bezel (see
Front bezel
on page
105
).
11.
Disconnect the backlight cable from the display panel.
NOTE:
Replace the backlight cable with the new backlight cable that comes with the new
display panel kit.
Remove the backlight cable from the defective panel before sending the panel back to the
supplier.
Figure 7-79
Disconnecting the backlight cable from the display panel
112
Chapter 7
Removal and Replacement Procedures All-in One (AIO) Chassis