Compaq Pro 6300 Maintenance & Service Guide Elite 8300 Touch All-in-One Bu - Page 67
Replacing the optical disc drive,
 |
View all Compaq Pro 6300 manuals
Add to My Manuals
Save this manual to your list of manuals |
Page 67 highlights
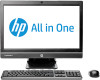
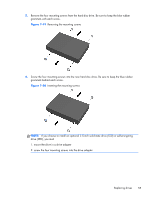
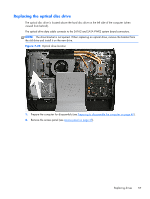
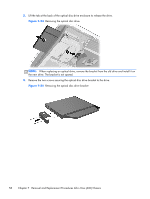
Replacing the optical disc drive The optical disc drive is located above the hard disc drive on the left side of the computer (when viewed from behind). The optical drive data cable connects to the SATA2 and SATA PWR2 system board connectors. NOTE: The drive bracket is not spared. When replacing an optical drive, remove the bracket from the old drive and install it on the new drive. Figure 7-23 Optical drive location 1. Prepare the computer for disassembly (see Preparing to disassemble the computer on page 40). 2. Remove the access panel (see Access panel on page 45). Replacing drives 57
-
 1
1 -
2
-
3
-
4
-
5
-
6
-
7
-
8
-
9
-
10
-
11
-
12
-
13
-
14
-
15
-
16
-
17
-
18
-
19
-
20
-
21
-
22
-
23
-
24
-
25
-
26
-
27
-
28
-
29
-
30
-
31
-
32
-
33
-
34
-
35
-
36
-
37
-
38
-
39
-
40
-
41
-
42
-
43
-
44
-
45
-
46
-
47
-
48
-
49
-
50
-
51
-
52
-
53
-
54
-
55
-
56
-
57
-
58
-
59
-
60
-
61
-
 62
62 -
 63
63 -
 64
64 -
 65
65 -
 66
66 -
 67
67 -
 68
68 -
 69
69 -
 70
70 -
 71
71 -
 72
72 -
73
-
74
-
75
-
76
-
77
-
78
-
79
-
80
-
81
-
82
-
83
-
84
-
85
-
86
-
87
-
88
-
89
-
90
-
91
-
92
-
93
-
94
-
95
-
96
-
97
-
98
-
99
-
100
-
101
-
102
-
103
-
104
-
105
-
106
-
107
-
108
-
109
-
110
-
111
-
112
-
113
-
114
-
115
-
116
-
117
-
118
-
119
-
120
-
121
-
122
-
123
-
124
-
125
-
126
-
127
-
128
-
129
-
130
-
131
-
132
-
133
-
134
-
135
-
136
-
137
-
138
-
139
-
140
-
141
-
142
-
143
-
144
-
145
-
146
-
147
-
148
-
149
-
150
-
151
-
152
-
153
-
154
-
155
-
156
-
157
-
158
-
159
-
160
-
161
-
162
-
163
-
164
-
165
-
166
-
167
-
168
-
169
-
170
-
171
-
172
-
173
-
174
-
175
-
176
-
177
-
178
-
179
-
180
-
181
-
182
-
183
-
184
-
185
-
186
-
187
-
188
-
189
-
190
-
191
-
192
-
193
-
194
-
195
-
196
-
197
-
198
-
199
-
200
-
201
-
202
-
203
-
204
-
205
-
206
-
207
-
208
 |
 |

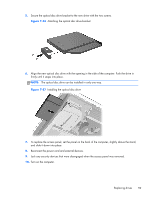
Replacing the optical disc drive
The optical disc drive is located above the hard disc drive on the left side of the computer (when
viewed from behind).
The optical drive data cable connects to the SATA2 and SATA PWR2 system board connectors.
NOTE:
The drive bracket is not spared. When replacing an optical drive, remove the bracket from
the old drive and install it on the new drive.
Figure 7-23
Optical drive location
1.
Prepare the computer for disassembly (see
Preparing to disassemble the computer
on page
40
).
2.
Remove the access panel (see
Access panel
on page
45
).
Replacing drives
57