D-Link DFL-200 Product Manual - Page 47
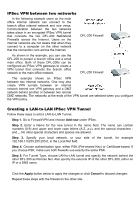
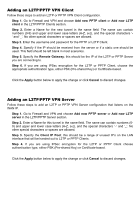
IPSec VPN between two networks, Creating a LAN-to-LAN IPSec VPN Tunnel, Step 1., Add new, Apply - add vpn
 |
UPC - 790069268823
View all D-Link DFL-200 manuals
Add to My Manuals
Save this manual to your list of manuals |
Page 47 highlights
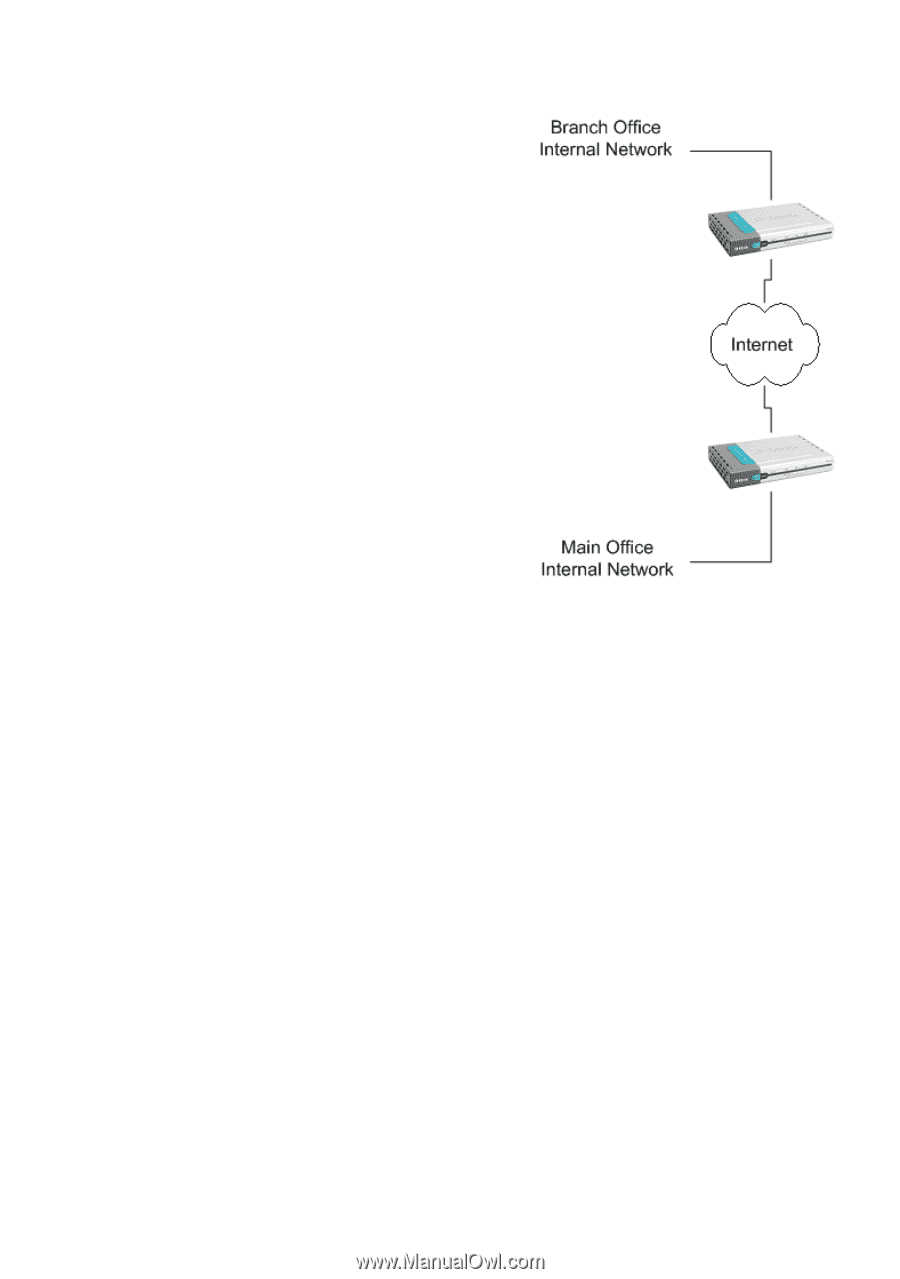
IPSec VPN between two networks In the following example users on the main office internal network can connect to the branch office internal network and vice versa. Communication between the two networks takes place in an encrypted IPSec VPN tunnel that connects the two DFL-200 NetDefend Firewalls across the Internet. Users on the internal networks are not aware that when they connect to a computer on the other network that the connection runs across the Internet. DFL-200 Firewall As shown in the example, you can use the DFL-200 to protect a branch office and a small main office. Both of these DFL-200s can be configured as IPSec VPN gateways to create a VPN tunnel that connects the branch office network to the main office network. DFL-200 Firewall The example shows an IPSec VPN between two internal networks. One may also create VPN tunnels between an internal network behind one VPN gateway and a DMZ network behind another or between two remote DMZ networks. The networks at the ends of the VPN tunnel are selected when you configure the VPN policy. Creating a LAN-to-LAN IPSec VPN Tunnel Follow these steps to add a LAN-to-LAN Tunnel. Step 1. Go to Firewall/VPN and choose Add new under IPSec. Step 2. Enter a Name for the new tunnel in the name field. The name can contain numbers (0-9) and upper and lower case letters (A-Z, a-z), and the special characters and _. No other special characters and spaces are allowed. Step 3. Specify your local network, or your side of the tunnel, for example 192.168.1.0/255.255.255.0, in the Local Net field. Step 4. Choose authentication type, either PSK (Pre-shared Key) or Certificate-based. If you choose PSK, make sure both firewalls use exactly the same PSK. Step 5. For Tunnel Type, choose LAN-to-LAN tunnel and specify the network behind the other DFL-200 as Remote Net. Also specify the external IP of the other DFL-200, either an IP or a DNS name. Click the Apply button below to apply the changes or click Cancel to discard changes. Repeat these steps with the firewall on the other site.
-
 1
1 -
2
-
3
-
4
-
5
-
6
-
7
-
8
-
9
-
10
-
11
-
12
-
13
-
14
-
15
-
16
-
17
-
18
-
19
-
20
-
21
-
22
-
23
-
24
-
25
-
26
-
27
-
28
-
29
-
30
-
31
-
32
-
33
-
34
-
35
-
36
-
37
-
38
-
39
-
40
-
41
-
 42
42 -
 43
43 -
 44
44 -
 45
45 -
 46
46 -
 47
47 -
 48
48 -
 49
49 -
 50
50 -
 51
51 -
 52
52 -
53
-
54
-
55
-
56
-
57
-
58
-
59
-
60
-
61
-
62
-
63
-
64
-
65
-
66
-
67
-
68
-
69
-
70
-
71
-
72
-
73
-
74
-
75
-
76
-
77
-
78
-
79
-
80
-
81
-
82
-
83
-
84
-
85
-
86
-
87
-
88
-
89
-
90
-
91
-
92
-
93
-
94
-
95
-
96
-
97
-
98
-
99
-
100
-
101
-
102
-
103
-
104
-
105
-
106
-
107
-
108
-
109
-
110
-
111
-
112
-
113
-
114
-
115
-
116
-
117
-
118
-
119
-
120
-
121
-
122
-
123
-
124
-
125
-
126
-
127
-
128
-
129
-
130
-
131
-
132
 |
 |