D-Link DFL-200 Product Manual - Page 57
Enable DHCP Server, Disable DHCP Server/Relay, Relay DHCP Requests to other DHCP server
 |
UPC - 790069268823
View all D-Link DFL-200 manuals
Add to My Manuals
Save this manual to your list of manuals |
Page 57 highlights
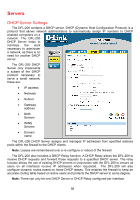
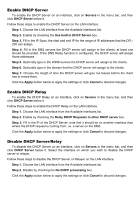
Enable DHCP Server To enable the DHCP Server on an interface, click on Servers in the menu bar, and then click DHCP Server below it. Follow these steps to enable the DHCP Server on the LAN interface. Step 1. Choose the LAN interface from the Available interfaces list. Step 2. Enable by checking the Use built-in DHCP Server box. Step 3. Fill in the IP Span, the start and end IP for the range of IP addresses that the DFL200 can assign. Step 4. Fill in the DNS servers the DHCP server will assign to the clients; at least one should be provided. If the DNS Relay function is configured, the DHCP server will assign those addresses. Step 5. Optionally type in the WINS servers the DHCP server will assign to the clients. Step 6. Optionally type in the domain that the DHCP server will assign to the clients. Step 7. Choose the length of time the DHCP server will give out leases before the client has to renew them. Click the Apply button below to apply the settings or click Cancel to discard changes. Enable DHCP Relay To enable the DHCP Relay on an interface, click on Servers in the menu bar, and then click DHCP Server below it. Follow these steps to enable the DHCP Relay on the LAN interface. Step 1. Choose the LAN interface from the Available interfaces list. Step 2. Enable by checking the Relay DHCP Requests to other DHCP server box. Step 3. Fill in the IP of the DHCP Server; note that it should be on another interface than where the DHCP request is coming from, i.e. a server on the DMZ. Click the Apply button below to apply the settings or click Cancel to discard changes. Disable DHCP Server/Relay To disable the DHCP Server on an interface, click on Servers in the menu bar, and then click DHCP Server below it. Select the interface on which you wish to disable the DHCP server or relayer. Follow these steps to disable the DHCP Server or Relayer on the LAN interface. Step 1. Choose the LAN interface from the Available interfaces list. Step 2. Disable by checking the No DHCP processing box. Click the Apply button below to apply the settings or click Cancel to discard changes.
-
 1
1 -
2
-
3
-
4
-
5
-
6
-
7
-
8
-
9
-
10
-
11
-
12
-
13
-
14
-
15
-
16
-
17
-
18
-
19
-
20
-
21
-
22
-
23
-
24
-
25
-
26
-
27
-
28
-
29
-
30
-
31
-
32
-
33
-
34
-
35
-
36
-
37
-
38
-
39
-
40
-
41
-
42
-
43
-
44
-
45
-
46
-
47
-
48
-
49
-
50
-
51
-
 52
52 -
 53
53 -
 54
54 -
 55
55 -
 56
56 -
 57
57 -
 58
58 -
 59
59 -
 60
60 -
 61
61 -
 62
62 -
63
-
64
-
65
-
66
-
67
-
68
-
69
-
70
-
71
-
72
-
73
-
74
-
75
-
76
-
77
-
78
-
79
-
80
-
81
-
82
-
83
-
84
-
85
-
86
-
87
-
88
-
89
-
90
-
91
-
92
-
93
-
94
-
95
-
96
-
97
-
98
-
99
-
100
-
101
-
102
-
103
-
104
-
105
-
106
-
107
-
108
-
109
-
110
-
111
-
112
-
113
-
114
-
115
-
116
-
117
-
118
-
119
-
120
-
121
-
122
-
123
-
124
-
125
-
126
-
127
-
128
-
129
-
130
-
131
-
132
 |
 |
